Achieving a true mirror-like shine is not about luck; it is a science of controlling surfaces and crystals at a microscopic level.
- The mold’s surface must be ‘micro-polished’, not just cleaned, to eliminate all invisible residues that scatter light.
- Perfectly tempered chocolate and colored cocoa butter must form stable Beta V crystals for maximum contraction and gloss.
- Every touch and temperature change post-molding is critical; even body heat can instantly destroy the fragile, glossy surface.
Recommendation: Treat every step as a critical part of a scientific process, from obsessive mold preparation to the final, gloved handling of the finished piece.
For the dedicated chocolatier, there is a profound difference between a merely ‘good’ bonbon and a true work of art. It lies in the finish: a flawless, deep, mirror-like shine that reflects light with the clarity of polished glass. Many can produce a decent sheen, but achieving that next level of perfection often feels elusive, a matter of luck rather than skill. You follow the established rules—you temper your chocolate, you use quality ingredients—yet the results can be inconsistent, sometimes marred by dull spots, streaks, or a frustrating lack of brilliance.
The common advice to “temper correctly” or “use good molds” is foundational, but it is not the whole story. These are the entry tickets, not the final secrets. The world of elite chocolatiers operates on a different plane, one where the pursuit of shine becomes a fanatical obsession with physics and chemistry. The truth is, that coveted gloss is not a happy accident. It is the direct, predictable result of mastering the microscopic interplay between surface tension, crystalline structure, and light refraction.
This is where we move beyond the basics. The key is not simply to clean your molds, but to micro-polish them. It’s not just about tempering chocolate, but about cultivating a flawless crystalline structure. This guide will deconstruct the entire process, piece by piece, revealing the scientific principles and meticulous techniques that separate amateur results from professional artistry. We will explore how every choice, from the material of your mold to the temperature of your hands, contributes to the final, spectacular gloss.
This comprehensive guide breaks down the essential pillars for achieving that perfect, jewel-like finish on your molded chocolates. Follow along as we dissect each stage, from the foundational preparation to the final, delicate touches.
Summary: The Art and Science of a Perfect Chocolate Shine
- Why Cleaning Molds with Cotton Wool Is Crucial for Shine?
- How to Paint Molds with Colored Cocoa Butter Before Casting?
- Polycarbonate vs. Silicone: Which Mold Material Gives Gloss?
- The Handling Mistake That Leaves Smudges on Finished Bonbons
- When to Tap the Mold to Release Bonbons Without Force?
- Why Is Tempering Essential for Snap and Shelf Life?
- How to Use Cocoa Butter to Thin Chocolate for Spraying?
- How to Emulsify Pigments into Fat for Vibrant Shells?
Why Cleaning Molds with Cotton Wool Is Crucial for Shine?
The journey to a mirror-like shine begins not with the chocolate, but with the surface it will touch. A visually clean mold is not enough. For a flawless gloss, the mold’s cavities must be microscopically pristine. Any invisible residue—tiny traces of cocoa butter fat, water minerals, or even dust particles—will act as a point of imperfection, scattering light and creating a subtle dullness on the final bonbon’s surface. This is why professional chocolatiers don’t just ‘wash’ their molds; they perform a surface preparation ritual.
Using cotton wool is essential because its soft, non-abrasive fibers can polish the surface without creating micro-scratches, which would also ruin the potential for a perfect shine. When paired with a mild acid like vinegar, it effectively dissolves and lifts the stubborn, invisible film of fat that soap and water can leave behind. This process of cleaning, drying, and polishing is less about sanitation and more about micro-polishing: creating the most perfect, uninterrupted surface possible for the tempered chocolate to bond with and replicate.
Think of it as preparing a canvas for a masterpiece painting. You would never start on a dirty or uneven surface. The same principle applies here. The shine on your bonbon is a perfect mirror image of the mold’s interior surface. If that surface is anything less than immaculate, the reflection will be compromised from the start. A truly obsessed chocolatier understands that this step is non-negotiable and is the first gatekeeper of quality.
Action Plan: Professional Mold Cleaning Protocol for Maximum Shine
- Clean each cavity with a cotton ball and vinegar to remove any cocoa butter residue.
- Wipe each cavity dry with a fresh cotton ball or a dedicated make-up applicator.
- Use a heat gun to lightly warm the cavities until they are just warm to the touch, ensuring zero moisture.
- Polish with a new, clean foam or cotton make-up applicator for a final microscopic buffing.
- Store molds upside down at room temperature, scraped clean immediately after each production run to prevent buildup.
How to Paint Molds with Colored Cocoa Butter Before Casting?
Applying colored cocoa butter is where the chocolatier’s artistry truly begins to take shape. However, this decorative layer is also a critical component of the final shine. To achieve a vibrant, glossy finish, the colored cocoa butter itself must be perfectly tempered and applied as an ultra-thin, uniform layer. A thick, uneven, or poorly tempered layer of color will obscure the shine of the chocolate shell beneath it, no matter how perfectly the chocolate itself is tempered.
The key is to treat the cocoa butter with the same scientific precision as the chocolate. For its crystalline structure to be stable and glossy, the cocoa butter silk is created by heating it at precisely 33.5°C (92.3°F). This ensures it sets with a shine and adheres perfectly to the micro-polished mold surface without flaking or cracking. The application method is equally important. While brushes and fingers have their place for certain artistic effects, they can leave streaks and an uneven thickness that interferes with light reflection.
For maximum reflection and a professional finish, airbrushing is the superior technique. It deposits the colored cocoa butter in a fine, atomized mist, creating a layer so thin and even that it becomes one with the final chocolate shell. This preserves the integrity of the mold’s polished surface, allowing light to pass through the color and reflect off the chocolate, creating depth and unparalleled brilliance.
The following table breaks down how each application method impacts the final result. As you’ll see, the pursuit of maximum shine dictates a clear choice for professional production.
| Technique | Layer Thickness | Shine Quality | Best Use Case |
|---|---|---|---|
| Airbrush | Ultra-thin | Maximum reflection | Professional production |
| Brush | Variable | May leave streaks | Artistic details |
| Finger | Thick | Minimal shine | Quick coverage |
Polycarbonate vs. Silicone: Which Mold Material Gives Gloss?
The choice of mold material is not a matter of preference; it is a critical decision dictated by physics. While flexible silicone molds offer convenience and ease of release for many applications, they are the enemy of a high-gloss finish. The reason lies in their very nature: silicone is flexible and has a microscopically porous texture. This flexibility means the mold can deform as the chocolate contracts, and the surface texture, while appearing smooth, will impart a satin or matte finish to the chocolate.
For a true mirror shine, the only professional choice is rigid, injection-molded polycarbonate. Its superiority comes from two key properties. First, its surface is exceptionally smooth and non-porous at a microscopic level, providing a perfect template for the chocolate to replicate. Second, its rigidity is crucial. As properly tempered chocolate cools, it contracts. In a rigid polycarbonate mold, this contraction causes the chocolate to pull away cleanly from the mold walls, a process essential for a clean release and a flawless surface.
This is why industry professionals confirm that polycarbonate chocolate molds are the gold standard. Their impact on the final shine, texture, and detail is dramatic and cannot be replicated with other materials. The rigidity ensures that the delicate, crystalline surface of the setting chocolate is not disturbed, allowing it to set into a perfectly smooth, highly reflective state.
As experts in the field note, the material itself is a primary ingredient in the recipe for shine. It’s an investment in a predictable, repeatable, and superior outcome.
The superior results achieved with polycarbonate molds produce chocolates with a highly polished and professional finish, making each piece exceptionally glossy and detailed.
– Professional Chocolate Confectionery Experts, Pastry Chefs Boutique Professional Guide
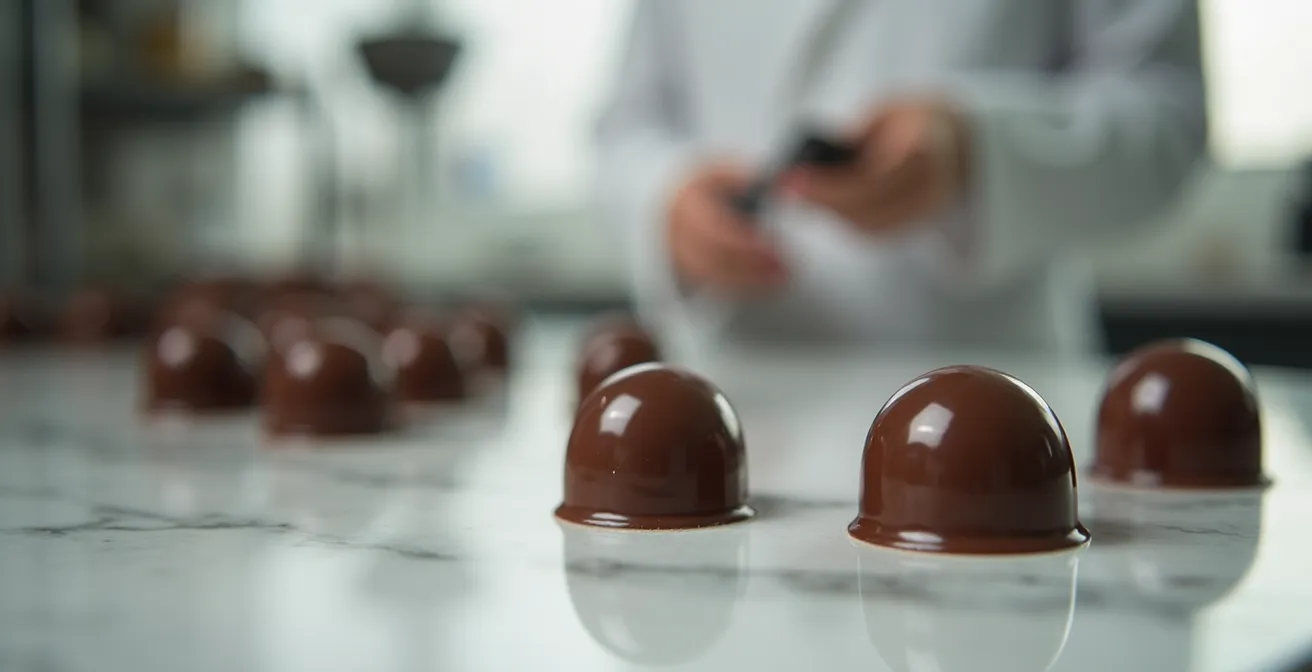
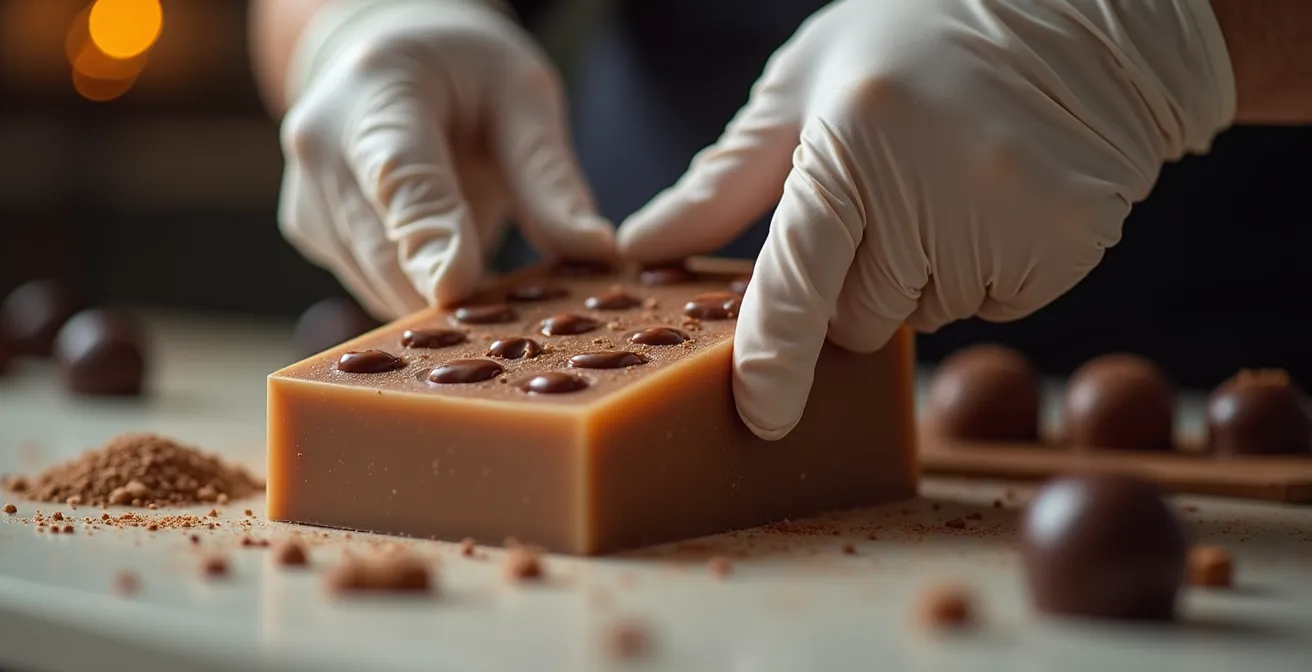
The Handling Mistake That Leaves Smudges on Finished Bonbons
A chocolatier can execute every step flawlessly—perfect micro-polishing, impeccable tempering, and ideal crystallization—only to ruin the masterpiece in the final seconds. The single most common mistake that destroys a mirror shine is improper handling. The culprit is heat. The delicate, glossy surface of a tempered bonbon is composed of stable Beta V crystals, which are solid at room temperature. However, they are highly sensitive to temperature changes.
The surface of your hands is the greatest threat. A study of thermal properties shows that the internal body temperature that can instantly affect chocolate crystals is 37°C (98.6°F). This is well above the melting point of the cocoa butter crystals that give chocolate its shine. The briefest touch from a bare finger is enough to transfer sufficient heat to melt the surface layer of crystals, instantly creating a dull smudge or a visible fingerprint. Once this damage is done, it is irreversible.
This is why a strict, no-touch protocol is observed in professional chocolate production. It’s not just about hygiene; it’s about preserving the physical integrity of the bonbon’s surface. Working in a cool environment and wearing clean, lint-free cotton gloves are not suggestions, but absolute requirements. Cotton is preferable to latex or nitrile as it is less likely to trap heat and moisture, providing a better thermal barrier between your hand and the delicate chocolate surface. Handling the bonbons only by their edges further minimizes the contact area and the risk of damage.
To preserve the shine you worked so hard to create, a disciplined handling protocol is essential:
- Always wear clean cotton gloves. Avoid latex or nitrile, which can trap heat and leave a residue.
- Handle bonbons by their edges only. This minimizes contact with the primary reflective surfaces.
- Work in a cool, low-humidity environment. Aim for 18-20°C (64-68°F) to maintain the stability of the crystal structure.
- Allow bonbons to “cure” for several hours at room temperature after demolding before packing them, allowing the surface to fully stabilize.
When to Tap the Mold to Release Bonbons Without Force?
The moment of demolding is one of truth for the chocolatier. A sharp, confident tap on the mold that results in an immediate, clean release of gleaming bonbons is the sign of a process perfectly executed. Conversely, having to use excessive force, or bonbons that stick, is a clear indicator of a problem, usually with the temper. The key is to understand that the “tap” is not about force; it is merely the final nudge to release a bonbon that has already decided to let go on its own.
This “letting go” is a physical phenomenon. As properly tempered chocolate cools and sets in a rigid polycarbonate mold, the stable Beta V crystals form a dense, tightly packed structure. A key property of this structure is that it contracts. This shrinkage, though slight, is enough to cause the entire bonbon to pull away from the smooth walls of the mold. You can often see this visually as small air gaps appearing between the chocolate and the transparent mold. This is your signal that the chocolate is ready.
If the chocolate was not tempered correctly, this contraction will not happen sufficiently. The unstable crystal structure will not be as dense, and the chocolate will adhere to the mold, refusing to release without being gouged or broken. Therefore, the moment to tap the mold is not determined by a timer, but by observing these visual cues of contraction.
Case Study: Visual Cues for Perfect Chocolate Release
Top-tier chocolatiers rely on sight over timers. They know that if the chocolate is tempered properly, it will shrink away from the walls of the mold as it sets. When this visible separation occurs, the bonbons are essentially floating in their cavities, held only by a slight surface tension. At this point, they will pop out with a gentle tap, requiring no force at all. This perfect release is the physical proof of a successful crystallization process, which is the direct cause of the flawless, glossy surface.
Why Is Tempering Essential for Snap and Shelf Life?
Tempering is the most discussed, yet often misunderstood, process in chocolate work. It is not merely a process of melting and cooling; it is the deliberate science of crystal cultivation. The fat in cocoa butter can crystallize into six different forms (labeled I through VI), but only one of them, the Beta V crystal, gives tempered chocolate all of its desirable qualities: a glossy shine, a hard surface, a clean “snap” when broken, and a stable structure that resists melting at room temperature.
The goal of tempering is to encourage the formation of as many of these stable Beta V crystals as possible, while eliminating the unstable forms. This stable structure is what gives chocolate its strength and shine. When chocolate is simply melted and allowed to cool on its own, a chaotic mix of unstable crystals forms, resulting in a product that is soft, crumbly, dull, and prone to fat bloom. This is why untempered chocolate feels tacky and melts on your fingers instantly.
The stability of Beta V crystals is remarkable. Research from pastry experts shows that these prized crystals are what provide the contraction needed for easy release from molds and a smooth melt-in-the-mouth feel.
Form V crystals result in a chocolate that contracts and releases from a mold, has a nice shine or even a gloss if formed in a smooth shiny mold cavity, breaks cleanly with a snap, and has a very smooth melt in the mouth.
– Pastry Arts Magazine, Chocolate Tempering: Beta Crystal Nucleation and The Purple Haze Phenomenon
Furthermore, this stable structure has a higher melting point. A crucial data point for chocolatiers is that the critical temperature at which prized Beta V crystals melt is 34.4°C (94°F). This is significantly higher than the melting point of unstable crystals, which is why a well-tempered bonbon can be handled (briefly, with gloves!) and remains stable on a shelf, preserving its snap and shine for weeks.
How to Use Cocoa Butter to Thin Chocolate for Spraying?
For applications like creating a fine, velvety “velvet” spray effect or for use in a chocolate spray gun, the viscosity of even perfectly tempered chocolate is often too high. It needs to be thinned to a more fluid consistency. The only way to do this without compromising the chocolate’s integrity is by adding more of its own primary ingredient: cocoa butter. Adding any other type of fat or liquid would disrupt the crystallization process and ruin the temper.
The process involves gently melting additional cocoa butter and incorporating it into the tempered chocolate. This increases the overall fat content, making the mixture more fluid and sprayable. However, this is a delicate balance. Adding too little won’t achieve the required fluidity, while adding too much can dilute the chocolate flavor and make the final shell too soft or brittle. The professional standard is a precise ratio.
For optimal fluidity for spraying, professionals recommend adding cocoa butter at 10-15% by weight of the chocolate. For example, for every 100g of chocolate, you would add between 10g and 15g of melted cocoa butter. It is crucial to understand that this addition fundamentally changes the composition of the chocolate. This “new” mixture has a higher fat percentage and therefore a slightly different tempering curve. It must be carefully re-tempered to ensure the Beta V crystals can form correctly in this new environment.
The temperature for spraying this thinned mixture is also critical and depends on the equipment being used:
- Add 10-15% melted cocoa butter by weight to your tempered chocolate.
- Gently stir to fully incorporate, maintaining the chocolate’s temper.
- For a larger auto body-style spray gun, the mixture should be heated to approximately 33°C (91°F).
- For a smaller, finer airbrush, a slightly higher temperature of up to 34°C (93°F) may be necessary for it to flow correctly.
- Always stir the mixture continuously while working to maintain a homogenous consistency and temperature.
Key Takeaways
- Pristine Surface Preparation: A mirror shine is a reflection. It begins with micro-polishing the mold to an atomically smooth surface, as any residue, however small, will prevent a perfect gloss.
- Total Crystalline Control: The goal of tempering is the deliberate cultivation of stable Beta V crystals in both the chocolate and any colored cocoa butter used. This structure is responsible for gloss, contraction, and snap.
- Post-Molding Sanctity: The moment a bonbon is demolded, it is at its most vulnerable. Preserving the shine requires a fanatical devotion to temperature control and gloved, minimal handling to prevent the fragile surface crystals from melting.
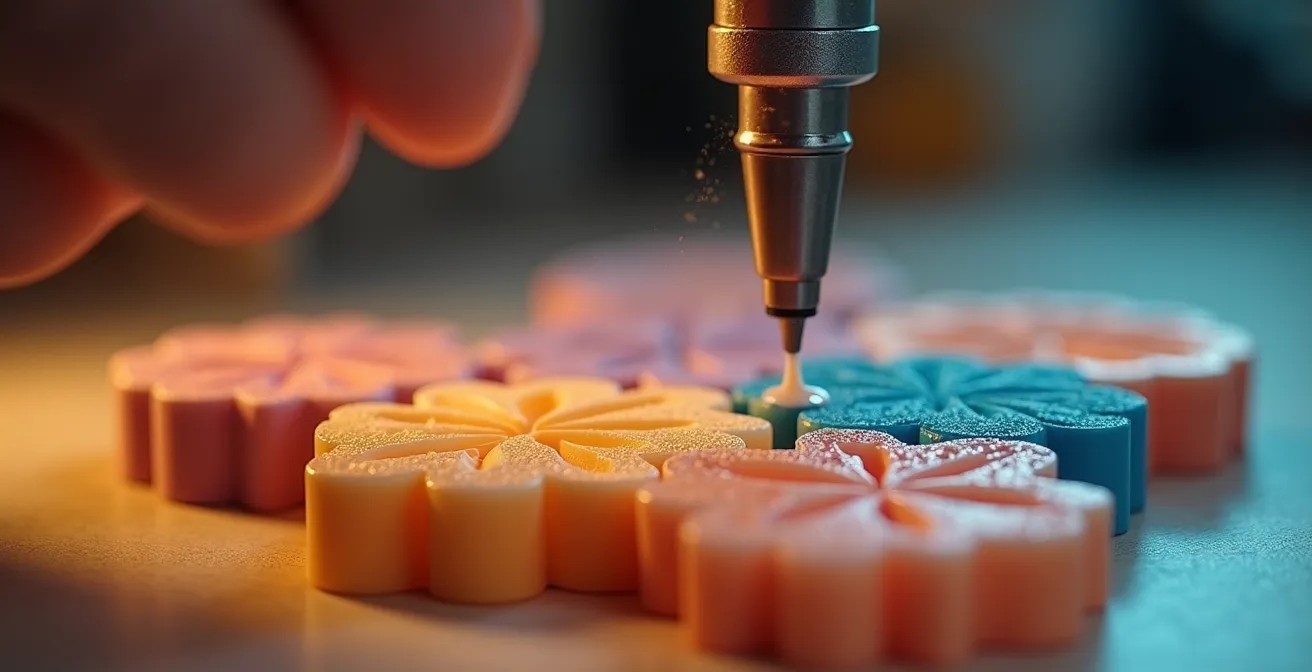
How to Emulsify Pigments into Fat for Vibrant Shells?
Creating brilliantly colored bonbons requires more than just mixing color into cocoa butter. To achieve a uniform, intense, and glossy color layer, the pigment must be perfectly emulsified into the fat. Any clumps or unevenly dispersed particles will create specks in the finish and disrupt the smooth surface needed for shine. The key lies in choosing the right type of pigment and using the right technique to break it down.
The first rule is absolute: only fat-soluble pigments can be used. Water is the mortal enemy of chocolate and cocoa butter. Attempting to use a water-based color will cause the fat to seize instantly, creating a thick, lumpy mess with zero potential for shine. Fat-soluble pigments, either in powder or pre-dispersed liquid form, are designed to integrate seamlessly with the cocoa butter.
Even with the correct pigment, simple stirring is not enough to achieve a perfect suspension. The goal is to break the pigment particles down to a microscopic size (micronization) so they are evenly distributed throughout the cocoa butter. This prevents them from settling out and ensures a homogenous, vibrant color.
Case Study: Professional Pigment Emulsification Technique
To achieve a perfectly uniform color suspension, professional chocolatiers use high-shear mixing. They will combine melted cocoa butter and fat-soluble powder color in a container and then use an immersion blender. The intense speed and vortex created by the blender blades micronize the pigment particles, breaking them down and forcing them into a stable emulsion within the fat. This technique creates a perfectly homogeneous liquid that prevents color specks, ensures a uniform application, and helps maintain a high-gloss finish.
The difference between pigment types is not subtle; it is the difference between success and failure, as this comparison clearly shows.
| Pigment Type | Dispersion Quality | Effect on Crystallization | Final Shine Result |
|---|---|---|---|
| Fat-Soluble | Excellent | Minimal interference | High gloss maintained |
| Water-Based | Causes seizing | Complete disruption | No shine possible |
| Powder (dispersed) | Good if micronized | Slight interference | Good shine with proper tempering |
Embrace this mindset of microscopic precision and scientific artistry in your own kitchen. Begin today to implement these techniques, transforming your bonbons from simple confections into the flawless, jewel-like works of art they are meant to be.