Achieving a professional, shelf-stable ganache is a matter of food engineering, not just following a recipe; it requires controlling water activity and the physical state of fat.
- The key is to create a fine, stable emulsion where water is chemically bound by specific sugars like sorbitol, lowering its “activity” (Aw) below the threshold for microbial growth.
- Proper temperature control is non-negotiable to ensure cocoa butter crystallizes in its most stable form (Form V), preventing the fat and water phases from separating over time.
Recommendation: Stop thinking in terms of ratios and start thinking in terms of physics. Master the use of an immersion blender to create a stable emulsion and send your final formulation for a water activity (Aw) test to certify its shelf life.
For any chocolatier aiming to sell their creations, extending the shelf life of a ganache from a few days to over six weeks is the holy grail. The common advice often circles around simple recipe adjustments: use less cream, add a splash of alcohol, or just keep it refrigerated. While not incorrect, these are surface-level fixes. They fail to address the fundamental physics and chemistry that govern a ganache’s stability. A truly shelf-stable product isn’t born from a slightly modified recipe; it’s engineered with a deep understanding of its components.
The real challenge lies in two critical areas: managing the water and managing the fat. A ganache is an emulsion—a delicate suspension of fat globules from chocolate within a water-based liquid like cream. Its failure, whether through microbial growth or separation, is a result of this emulsion breaking down. The secret to longevity is not simply reducing water, but controlling its “Water Activity” (Aw)—a measure of “free” water available for microbes to use. Likewise, the smooth, glossy texture of a perfect ganache depends entirely on the crystalline structure of the cocoa butter within it.
This guide abandons home-kitchen approximations to focus on the core engineering principles. We will dissect the mechanics of a stable emulsion, explore the chemical tools that bind water, and demystify the temperature science that prevents separation. The goal is to shift your perspective from that of a pastry chef to that of a formulation scientist. By mastering these concepts, you can reliably and repeatedly produce a ganache that remains perfect not for days, but for weeks.
This article provides a complete roadmap for engineering a shelf-stable ganache. You will learn the scientific principles, the correct techniques for execution, and the validation methods required for professional production.
Table of Contents: Mastering the Engineering of Shelf-Stable Ganache
- Why the “Mayonnaise Method” Works for Chocolate Emulsions
- Glucose vs. Sorbitol: Which Sugar Keeps Ganache Moist Longer?
- The Temperature Gap Mistake That Separates Fat From Liquid
- Why Does Your Dark Chocolate Ganache Split and Look Oily?
- How to Use an Immersion Blender Without Incorporating Oxygen
- When to Send Your Ganache to the Lab for Aw Testing?
- How to Keep Macaron Shells Crisp With High-Moisture Fillings?
- The Freezing Mistake That Makes Macarons Weep Upon Thawing
Why the “Mayonnaise Method” Works for Chocolate Emulsions
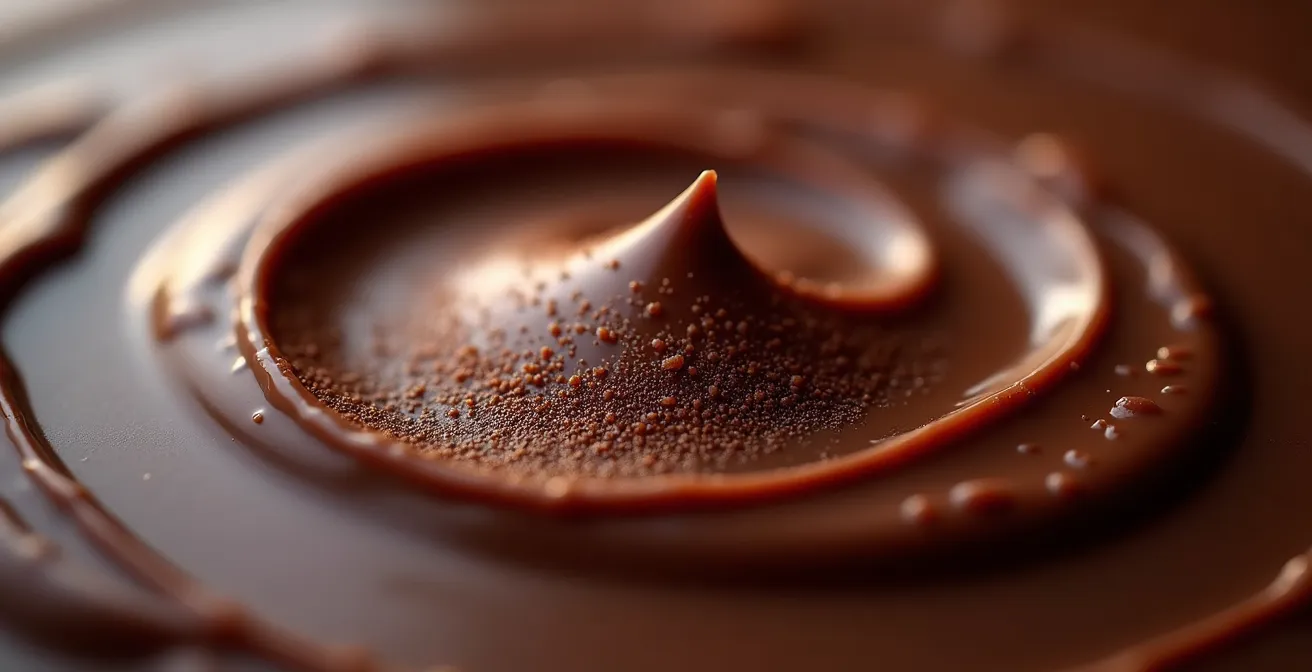
A stable ganache is, at its core, a successful oil-in-water emulsion. The fat phase (cocoa butter) is broken down into microscopic droplets and evenly dispersed throughout the water phase (from the cream or other liquids). The principle is identical to making mayonnaise, where egg yolk lecithin emulsifies oil into vinegar. In chocolate, the emulsifier is naturally present: lecithin. To create a stable, fine emulsion that won’t separate, you need to apply significant physical force, known as shear force.
This is where the “mayonnaise method” comes in. Instead of gently whisking, you use a high-shear tool like an immersion blender. The blender’s blades spin at high speed, violently breaking down the fat globules into much smaller sizes. The smaller and more uniform the fat droplets, the more stable the emulsion becomes, as the surface tension and lecithin can more effectively keep them suspended. This process is not about mixing; it is a physical restructuring of the liquid.
As King Arthur Baking notes, an immersion blender is a versatile tool in a bakery, and for ganache, its primary function is emulsification. Simply melting chocolate into cream creates a coarse, unstable emulsion prone to splitting. The intense shear from a blender, however, forces the fat and water into a homogenous, tightly bound state. This results in the glossy, smooth texture of a professional ganache and is the first mechanical step toward long-term stability.
Glucose vs. Sorbitol: Which Sugar Keeps Ganache Moist Longer?
Once the physical emulsion is established, the next challenge is chemical: controlling water activity (Aw). Aw is a measure of the “free” water in a product available for microbial growth. To achieve a long shelf life, you must lower the Aw by binding water molecules to other ingredients, effectively making the water unavailable. Sugars are the primary tool for this, but not all sugars are created equal. While standard sucrose helps, specialized sugars offer far superior performance.
This is where the choice between glucose syrup and sorbitol becomes critical. Both are less sweet than sucrose and have a powerful ability to bind water (hygroscopicity). However, their properties differ significantly in a professional context. Sorbitol, a sugar alcohol, demonstrates superior water-binding capabilities and is excellent at preventing sugar crystallization, which can lead to a grainy texture over time. Glucose syrup is also effective, but sorbitol’s power to lower Aw is more pronounced.
The following table, based on common industry knowledge, highlights the key differences for ganache applications:
| Property | Glucose Syrup | Sorbitol |
|---|---|---|
| Relative Sweetness | 0.7 (vs sugar) | 0.6 (vs sugar) |
| Water Binding | Good | Superior |
| Crystallization Prevention | Moderate | Excellent |
| Recommended Addition | 5% of total mass | Max 5% (laxative effect) |
The strategic use of sorbitol or a blend of sugars allows you to engineer a ganache’s texture and, most importantly, its microbial stability. By binding free water, you create an environment where bacteria and mold cannot thrive, extending shelf life dramatically without relying on artificial preservatives. According to industry formulation data, achieving an Aw between 0.75-0.80 can result in a shelf life of 16-26 weeks, a target impossible to reach with simple cream and chocolate recipes.
The Temperature Gap Mistake That Separates Fat From Liquid
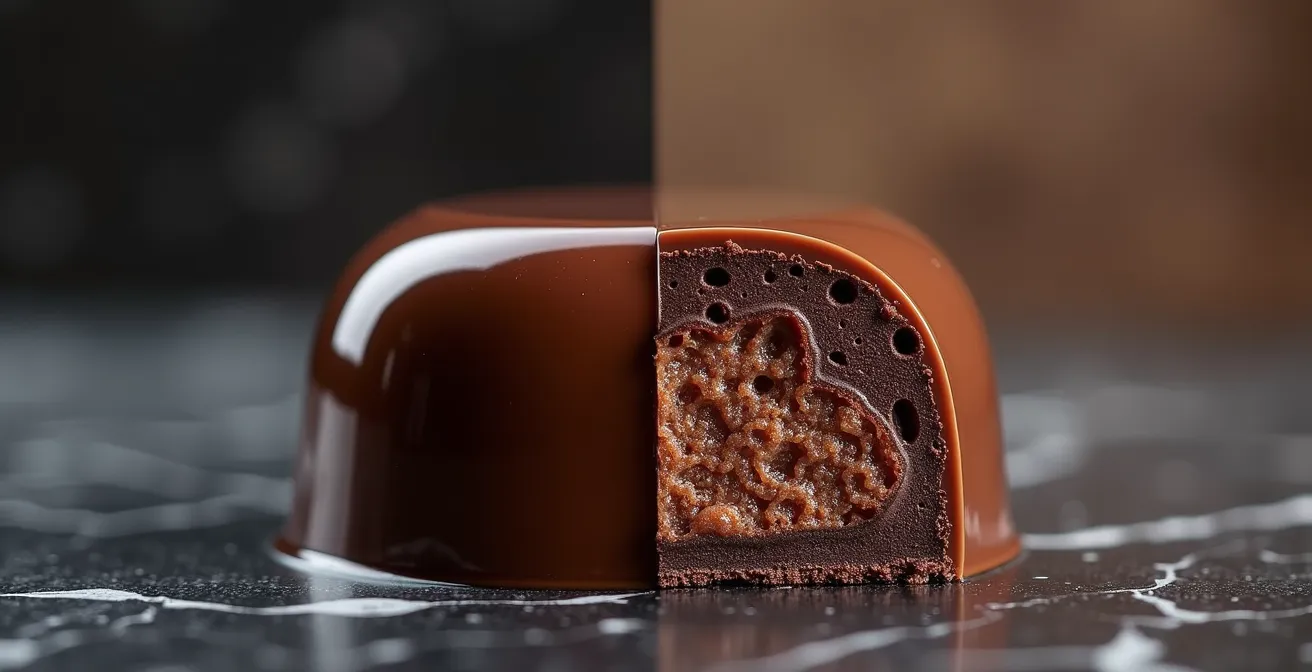
Even with a perfect emulsion and low water activity, a ganache can still fail if the fat phase is not properly managed. The culprit is the complex nature of cocoa butter, which can crystallize in six different forms, a property known as polymorphism. Only one of these forms, Form V (Beta), provides the stable, shiny, and snappy structure desired in chocolate. The other forms are unstable and will cause the ganache to split, become oily, or develop a dull, grainy texture over time.
The most common mistake is creating a large temperature gap when combining the hot liquid (cream) and the chocolate. Pouring boiling cream over cool chocolate causes a thermal shock. This shock melts the cocoa butter completely but doesn’t allow it to cool and re-crystallize in the stable Form V. Instead, it forms unstable crystals that cannot hold the fat within the emulsion. The result is a “split” or “broken” ganache, where oil leaches out and pools on the surface.
Scientific research on cocoa butter polymorphism reveals that Form V crystals, the ideal structure, melt around 34°C (93°F). To encourage their formation, the ingredients should be combined at temperatures close to this point, typically between 35-40°C (95-104°F). This controlled environment allows the fat to emulsify properly and then set into its strongest, most stable crystalline form, locking the emulsion in place for weeks.
Case Study: Split Ganache Recovery Protocol
When a ganache splits due to temperature shock, the emulsion has broken. The standard recovery method involves adding a small amount of warm liquid (milk or cream) drop by drop while whisking vigorously to try and re-emulsify the fat. However, this often dilutes the ganache and raises its water activity. A more effective, albeit not perfect, solution is to use an immersion blender on high speed. The intense shear force can mechanically force the separated fat and water phases back into a temporary emulsion. While this can save a batch from being discarded, the final texture may remain slightly compromised once set, underscoring the importance of getting the temperature right from the start.
Why Does Your Dark Chocolate Ganache Split and Look Oily?
The principles of emulsion and temperature control are universal, but dark chocolate presents a unique challenge that magnifies any small error in technique. Dark chocolate ganaches are notoriously more prone to splitting than their milk or white chocolate counterparts. The reason is not the flavor, but the fundamental composition: a much higher ratio of cocoa butter (fat) to cocoa solids and a lower amount of built-in emulsifiers like milk solids.
A typical 70% dark chocolate, for example, has a very high fat content. When you create a ganache, you are trying to emulsify this large amount of fat into a relatively small amount of water from the cream. The balance is delicate. If the temperature is not perfectly managed or the shear force is insufficient, the system becomes overloaded with fat. The water phase simply cannot hold all the cocoa butter droplets in suspension, and the emulsion breaks. This is why standard 1:1 ratios (chocolate to cream) that work for milk chocolate will almost always fail with high-percentage dark chocolate.
To counteract this, the formulation must be adjusted. As a general rule, a stable dark chocolate ganache requires a higher proportion of chocolate to cream. A 2:1 ratio (chocolate to cream by weight) is a common starting point for 70% dark chocolate. This reduces the overall water content, making it easier for the available lecithin to emulsify the high quantity of fat. In essence, you are rebalancing the fat-to-water ratio to a point where a stable emulsion is physically possible. Ignoring this compositional reality is the primary reason why dark chocolate ganaches often end up as an oily, separated mess.
How to Use an Immersion Blender Without Incorporating Oxygen
While the immersion blender is the key to creating a fine emulsion, improper use introduces a new enemy to shelf life: oxygen. Whipping or blending in a way that creates foam incorporates air into the ganache. This air contains oxygen, which promotes oxidation, leading to off-flavors over time. Furthermore, the air bubbles create pockets that can harbor aerobic microbes, compromising the microbial stability you worked so hard to achieve with low water activity.
As the experts at the Callebaut Chocolate Academy warn, you should never whip ganache if stability is the goal, as it introduces large volumes of air and increases microbial exposure. The goal is to apply intense shear force *without* incorporating air. This is achieved by creating a controlled vortex where the blender’s blades remain fully submerged, continuously pulling the mixture downward and through the blades without breaking the surface of the liquid.
A specific technique is required to achieve this. It involves tilting the container and using the blender in short pulses to manage the vortex and prevent air from being drawn in. Using a tall, narrow container is also crucial as it minimizes the surface area exposed to air and helps maintain a deep, controlled vortex. This professional method ensures you get all the benefits of high shear emulsification without the detrimental side effects of aeration.
Action Plan: The Controlled Vortex Technique for Oxygen-Free Blending
- Submerge Completely: Always keep the blender head fully submerged below the surface of the liquid before, during, and after operation. Never lift it out while it is running.
- Tilt for a Vortex: Tilt the mixing container at a 45-degree angle. This creates an offset center, allowing a deep, controlled vortex to form that pulls ingredients down without sucking in air from the surface.
- Use Short Pulses: Instead of continuous blending, use short, controlled pulses (2-3 seconds at a time). This allows any micro-bubbles that may have formed to rise and dissipate before they are permanently sheared into the emulsion.
- Choose a Tall Receptacle: Use a tall, narrow container that is just slightly wider than the blender head. This minimizes the surface area exposed to air and promotes a stable, deep vortex.
When to Send Your Ganache to the Lab for Aw Testing?
After applying all the principles of emulsion, formulation, and technique, you have an engineered ganache that is theoretically shelf-stable. However, for professional sales and legal compliance, theory is not enough. You need proof. The only way to definitively know your ganache’s shelf life is to measure its water activity (Aw) with a specialized meter.
An Aw meter is a scientific instrument that measures the vapor pressure of water in a sample, providing a precise value between 0.0 and 1.0. This value directly correlates to microbial stability. Most pathogenic bacteria cannot grow below an Aw of 0.87. Therefore, achieving a target Aw of 0.85 or below is the industry standard for creating a product considered “shelf-stable” at room temperature, without the need for refrigeration. According to food science data, water activity measurements demonstrate that an Aw below 0.85 can achieve a shelf life of 6 weeks or more, while a ganache with an Aw of 0.86 is limited to about 3 weeks.
So, when is it time to test? You should send a sample of your finalized recipe to a food science lab for an official Aw reading. This is not something you do for every batch. The goal is to get a certified baseline Aw value for a specific, documented recipe. Once you have a certified result showing your ganache is below the 0.85 threshold, you can confidently reproduce that exact recipe and technique, knowing it meets the standard for shelf stability. This certified test is your quality assurance and your defense against liability.
How to Keep Macaron Shells Crisp With High-Moisture Fillings?
The principles of creating a low water activity ganache extend far beyond simple shelf life; they solve other complex pastry challenges. A classic example is the macaron. A perfect macaron should have a crisp shell that yields to a chewy interior. However, when filled with a traditional ganache, moisture from the filling inevitably migrates into the delicate, dry shell, turning it soft and soggy within a day.
A ganache engineered for a 6-week shelf life is the perfect solution to this problem. As a leading expert in the field explains, this type of ganache is fundamentally different in how it behaves.
A ganache engineered for a 6-week shelf life has its water molecules so tightly bound by sugars that there is very little ‘free water’ available to migrate.
– Dr. Jean-Pierre Wybauw, Fine Chocolates: Great Experience
Because the water in a low-Aw ganache is chemically locked in place by sugars like sorbitol, it cannot move into the macaron shell. This allows the macaron to “mature” in flavor as the ganache and shell meld, but without the destructive moisture transfer. For ultimate protection and to create a macaron that stays crisp for days, an additional barrier can be created. This professional technique involves “waterproofing” the inside of the macaron shell with a micro-thin layer of tempered cocoa butter. This fat barrier physically blocks any potential moisture migration, however minimal.
- First, temper pure cocoa butter to achieve stable Form V crystals.
- Using a food-safe brush, paint a paper-thin layer on the inside surface of each macaron shell.
- Allow the cocoa butter to fully crystallize in a cool, dry environment for 12-24 hours.
- Finally, fill the “waterproofed” shells with your matured, low-Aw ganache that has already set for at least 24 hours.
Key Takeaways
- Ganache stability is an engineering problem solved by controlling the physics of emulsion and the chemistry of water activity (Aw).
- Use an immersion blender with a controlled vortex technique to create a fine, stable emulsion without incorporating oxygen.
- Utilize sugars like sorbitol to chemically bind free water, lowering the Aw to 0.85 or below to inhibit microbial growth and achieve a shelf life of 6+ weeks.
The Freezing Mistake That Makes Macarons Weep Upon Thawing
Freezing is a common strategy for preserving filled macarons, but it introduces a final, critical risk: condensation during thawing. When a frozen macaron is brought directly to room temperature, the cold surface causes moisture from the ambient air to condense on it. This water is then absorbed by the delicate shell, making it “weep” and turn sticky and soft, undoing all the careful work of creating a crisp texture.
This is a purely physical phenomenon that can be entirely avoided with a controlled, multi-stage thawing protocol. The goal is to bring the macarons to room temperature so gradually that their surface temperature never drops below the dew point of the surrounding air, thus preventing condensation from ever forming. This requires patience and, most importantly, keeping the macarons in a completely airtight container throughout the entire process.
The sealed container is crucial. It isolates the macarons from the humid room temperature air. Any temperature change happens within the small, controlled volume of air inside the container, preventing external moisture from coming into contact with the product. Removing the macarons from the container before they have fully acclimatized to room temperature is the single biggest mistake that leads to weeping.
To execute this correctly, follow a strict, three-step process:
- Step 1 (Freezer to Refrigerator): Move the completely airtight container from the freezer to the refrigerator. Keep it sealed and allow the macarons to thaw slowly for 6 to 8 hours. This brings their temperature up from sub-zero to just a few degrees above freezing.
- Step 2 (Refrigerator to Room Temp): Transfer the still-sealed container from the refrigerator to a cool spot at room temperature. Let it sit for another 1 to 2 hours. This allows the macarons to gradually warm up from fridge temperature to ambient temperature.
- Step 3 (Unsealing): Only after the container and its contents have fully reached room temperature should you open it. The shells will be dry, crisp, and completely free of condensation.
To put these engineering principles into practice, the next logical step is to design a recipe, execute it using the techniques described, and send the final product for professional Aw testing to certify its stability.
Frequently Asked Questions About Professional Ganache Formulation
How much does professional Aw testing cost?
The cost varies, but state universities or private food science labs can often test ganache samples for approximately $25-$500 depending on the location and scope of the test. For those planning frequent formulation, investing in an in-house meter like a Decagon PawKit, which costs around $500 used or $1500 new, can be more economical.
When should I test a new recipe?
You should test a recipe once it has been completely finalized. The goal is to obtain a single, certified baseline Aw value. If that value is safely below the 0.85 threshold, you can then reproduce that exact recipe and process with confidence, knowing it meets the standard for shelf stability without needing to test every batch.
What if my Aw reading is 0.86?
An Aw of 0.86 is not an automatic failure, but it means the product is not shelf-stable on its own. It requires additional preservation methods, a concept known as “hurdle technology.” You would need to combine the moderately low Aw with other hurdles, such as maintaining proper refrigerated storage, ensuring the product is in a sealed environment, and potentially lowering the pH, to achieve an extended and safe shelf life.