The secret to light almond cream isn’t whipping it airy—that’s what causes it to collapse. The goal is a stable, silken emulsion.
- A raw center is caused by the ganache insulating the cream; a partial pre-bake is the only solution.
- The choice of cocoa and specific techniques like using only egg yolks are crucial for achieving a melting, not cakey, texture.
Recommendation: Focus on keeping all ingredients at room temperature for a perfect emulsion and use the “wobble test” to know exactly when to pull your tart from the oven.
The classic chocolate and almond tart holds a revered place in the pastry canon. Yet, for the modern palate, it often presents a frustrating paradox: a cloyingly dense, heavy, and sometimes unpleasantly “cakey” frangipane layer trapped beneath a perfect chocolate ganache. Many pâtissiers, finding their creations weighed down, instinctively try to fix it by reducing sugar or butter, only to find the flavor compromised and the texture unchanged. The conversation around lightening this filling often circles around these superficial adjustments, failing to address the fundamental science at play.
To truly elevate this dessert, we must move beyond the traditional definition of frangipane (which is technically almond cream lightened with crème pâtissière) and focus on the almond cream itself. The common advice to “whip butter and sugar until fluffy” is a borrowed technique from cake-making that is actively detrimental here. But what if the true key to a light, melting almond cream wasn’t about subtraction or aeration, but about control? What if the secret lies in mastering the chemistry of a stable emulsion and understanding the physics of heat transfer during baking?
This guide will deconstruct the common failures of almond cream and provide a systematic, science-backed approach to building a superior filling from the ground up. We will explore why it remains raw, how to achieve a melting texture, and the precise techniques to guarantee a perfectly balanced, sophisticated tart every single time. By focusing on emulsion, temperature, and timing, you will transform your almond cream from a heavy liability into a silken, luxurious asset.
This article provides a comprehensive roadmap, guiding you from the foundational science to advanced finishing techniques. The following sections break down each critical step for achieving pastry perfection.
Summary: A Modern Pâtissier’s Guide to Flawless Almond Cream
- Why Your Almond Cream Remains Raw Under the Chocolate Ganache?
- Pistachio vs. Almond: Which Cream Bases Better with Dark Chocolate?
- How to Turn Plain Frangipane into Chocolate Almond Cream?
- The Mixing Mistake That Causes Your Tart Filling to Collapse
- How to Achieve a “Melting” Texture Instead of a Cakey One?
- Which Cocoa Powder Type Creates the Darkest, Moistest Cakes?
- How to Time the Baking of Lava Cakes to the Exact Second?
- The Cloche Trick: Keeping Pre-Cut Slices Moist During Service
Why Your Almond Cream Remains Raw Under the Chocolate Ganache?
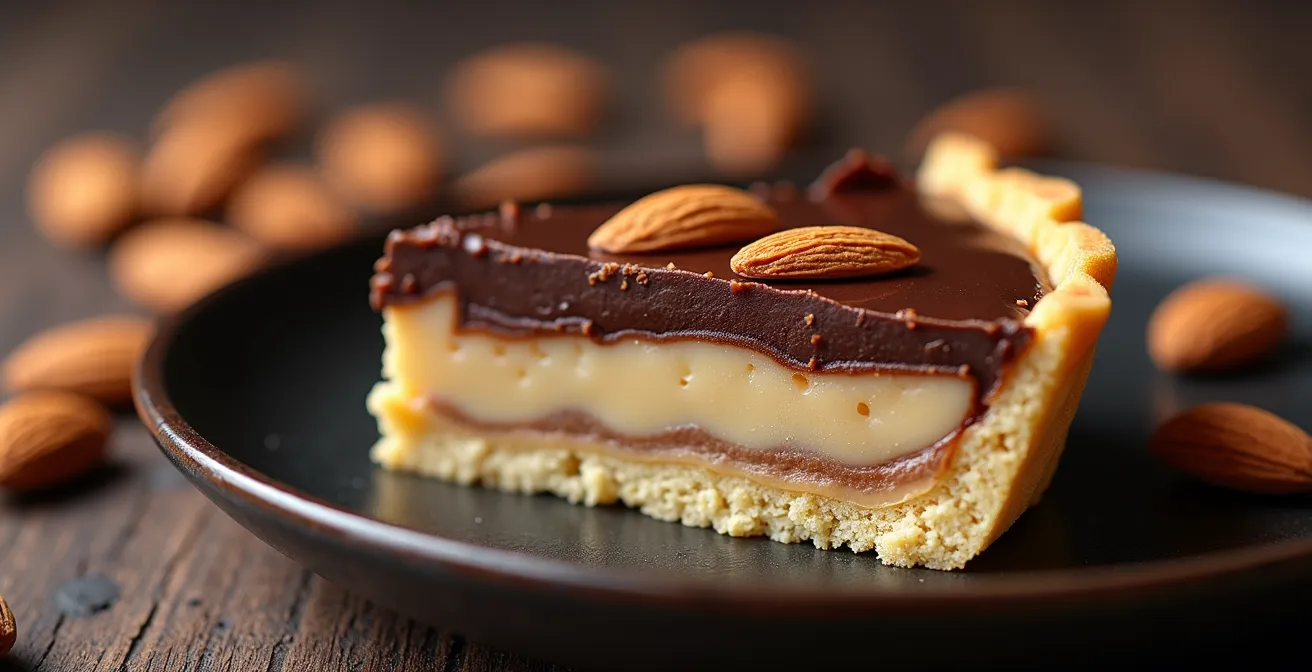
This is the most common and demoralizing failure: you cut into a beautiful tart, only to find a layer of uncooked, pasty almond cream at the bottom. The culprit isn’t a faulty recipe or an incorrect oven temperature. The problem is physics. A layer of ganache, or even a dense chocolate-almond cream, poured over the unbaked filling acts as a powerful thermal insulator. It effectively shields the cream below from the oven’s top heat, preventing it from baking through before the tart crust burns.
Many recipes call for pouring ganache over the baked cream, but if you’re making a single, homogenous chocolate-almond filling, this insulation effect is unavoidable. The moisture in the cream struggles to evaporate, and the proteins and starches never reach the temperature needed to set. The result is a gummy, raw layer that compromises the entire dessert. The solution is not to bake it longer, which will only dry out the top and burn the shell.
The only reliable professional technique is a two-stage bake. First, you blind-bake your tart shell until it’s completely golden and cooked. Then, you fill it with the almond cream and bake it *partially*, for about 15-20 minutes, until the cream is just beginning to set around the edges. Only then do you pour your ganache on top and finish the bake. This pre-bake gives the almond cream a critical head start, ensuring the bottom layer cooks through while the top layer fuses perfectly with the ganache. It’s an extra step, but it’s the non-negotiable secret to eliminating that raw-dough texture for good.
By understanding and countering this heat-blocking effect, you take the first and most important step toward a perfectly textured tart.
Pistachio vs. Almond: Which Cream Bases Better with Dark Chocolate?
Once you’ve mastered the baking technique, you can explore different nut bases. While almond is the classic choice, pistachio offers a fascinating alternative, especially when paired with intense, dark chocolate. The decision between them goes beyond mere flavor preference; it’s a choice that fundamentally alters the texture and richness of the final product due to their different chemical compositions, particularly their fat content.
Almonds provide a subtle, marzipan-like sweetness that complements milk or semi-sweet chocolate beautifully. Their fat content is substantial, but it’s the balance of fat, protein, and fiber that creates the classic frangipane structure. Pistachios, on the other hand, are significantly richer. As nutritional data shows, pistachios can have a fat content around 68%, compared to the 54-58% range for almonds. This higher fat percentage results in a cream that is naturally softer, denser, and more luscious. It produces a “melting” quality with less effort and provides a vibrant, slightly savory flavor that stands up magnificently to the bitterness of a 70% or higher dark chocolate.
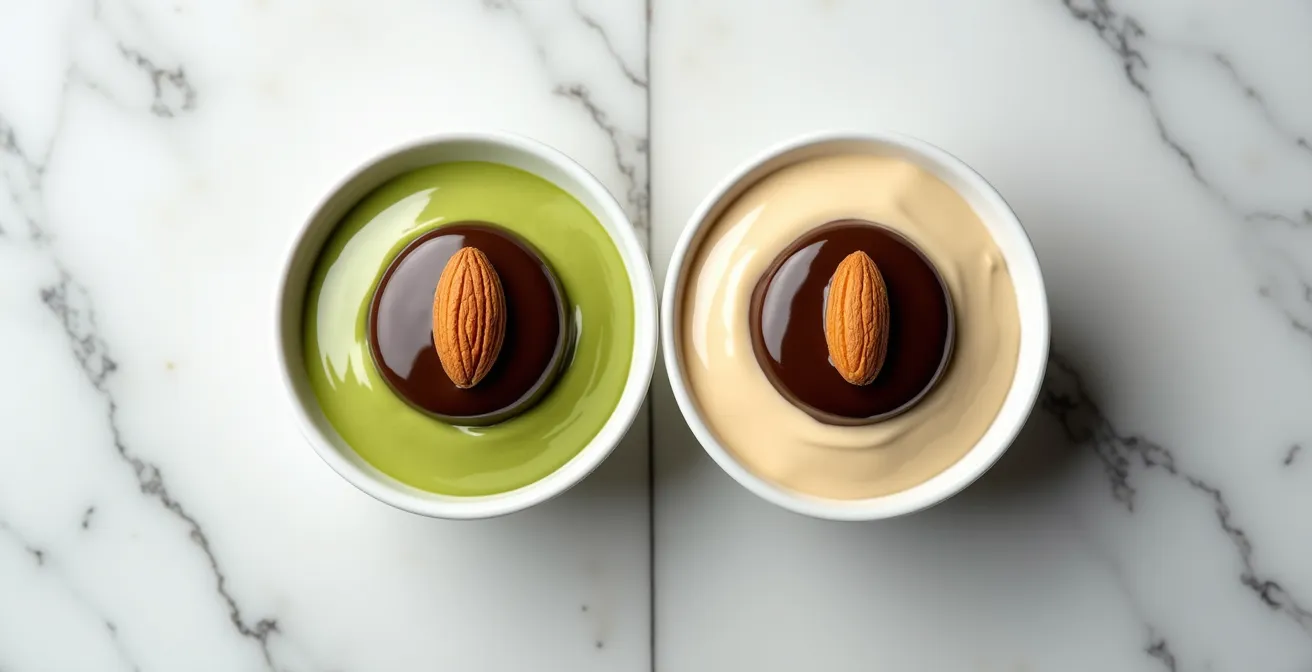
When choosing, consider your goal. For a lighter, more traditional tart that might be paired with fruit, almond cream is the versatile, reliable standard. For a decadent, sophisticated dessert where the filling should be as rich and intense as the chocolate it accompanies, pistachio cream is the superior choice. Its higher fat content creates a more luxurious, almost pudding-like consistency that is the epitome of a “melting” texture. The flavor pairing with dark chocolate is also more dynamic, offering a complex blend of sweet, savory, and bitter notes.
Ultimately, understanding how a nut’s fat content directly influences texture empowers you to make intentional choices rather than simply following a recipe.
How to Turn Plain Frangipane into Chocolate Almond Cream?
Incorporating chocolate directly into the almond cream transforms the filling into a singular, cohesive element. However, the method you choose—using cocoa powder versus melted chocolate—has a dramatic impact on the final texture and requires different adjustments to your base recipe. It’s a choice between a lighter, more cake-like result and a richer, fudgier one.
Using cocoa powder is the simplest method. It integrates easily and, because it’s primarily a dry ingredient, it helps to slightly firm up the cream, leading to a more structured, almost cake-like crumb. Using melted chocolate introduces additional cocoa butter (fat) and sugar, which makes the cream denser, richer, and more fudgy. This extra fat means you must adjust the amount of butter in your original recipe to maintain a stable emulsion and prevent it from becoming greasy.
As this comparative guide for bakers helps illustrate, the choice has clear consequences for both texture and preparation. The following table breaks down the practical differences.
| Method | Amount for 1 cup cream | Texture Result | Butter Adjustment |
|---|---|---|---|
| Cocoa Powder | 3 tablespoons | Cake-like, lighter | No change needed |
| Melted Chocolate | 2 oz (56g) | Fudgier, denser | Reduce by 1 tablespoon |
For a truly superior result, professional chefs favor high-fat, Dutch-processed cocoa powder. The process of “Dutching” neutralizes cocoa’s natural acidity, which prevents it from reacting with the fats in the nuts and butter, ensuring a smoother texture. Furthermore, high-fat (20-24%) Dutch-process cocoa delivers a rich, fudgy consistency without the added sugar and complexity of incorporating melted chocolate, giving you the best of both worlds: intense flavor and a silky mouthfeel.
This technical choice is fundamental in defining the final character of your tart, allowing you to precisely engineer the eating experience you desire.
The Mixing Mistake That Causes Your Tart Filling to Collapse
The single greatest mistake pâtissiers make when preparing almond cream is treating it like cake batter. They whip the butter and sugar until “light and fluffy,” incorporating a significant amount of air. While this aeration is desirable for a cake’s lift and crumb, it is the primary cause of a collapsed, dense, or greasy almond cream filling. The goal is not aeration; it is a stable, silken emulsion.
An emulsion is a forced mixture of fat and water (from butter and eggs). When you over-aerate the cream, you create thousands of tiny air pockets. In the heat of the oven, these air pockets expand rapidly, causing the filling to puff up dramatically, only to collapse and become dense as it cools. This process can also force the fat (butter) out of the mixture, resulting in a greasy texture. The key is to combine the ingredients gently and thoroughly, just until they are homogenous.
As the experts at the French Cooking Academy emphasize, technique is everything. In their guide on professional almond cream methods, they state:
The mixture should be smooth and homogenous, not necessarily ‘light and fluffy’. The goal is emulsification, not aeration.
– French Cooking Academy, Professional Almond Cream Techniques
To ensure a stable emulsion, temperature is just as critical as mixing. A stable mixture is much easier to achieve when all ingredients are at the same temperature. As professional baking guidelines indicate, all ingredients must be at room temperature (68-72°F) to prevent the emulsion from breaking. Cold eggs hitting softened butter will cause the butter to seize and separate, leading to a curdled, greasy mess. So, use a paddle attachment, not a whisk, and mix on low speed until just combined. The resulting cream should look dense and smooth, like a thick paste, not a fluffy frosting.
By shifting your focus from aeration to emulsification, you will create a filling that bakes into a stable, smooth, and perfectly textured layer every time.
How to Achieve a “Melting” Texture Instead of a Cakey One?
Once you’ve mastered a stable emulsion, the final frontier is refining the texture from merely “cooked” to truly “melting.” A cakey texture is the result of a strong protein and gluten network, similar to what you’d want in a muffin. A melting texture, by contrast, is closer to a dense custard or a baked pudding. It requires actively inhibiting these structural components and increasing richness through specific ingredient swaps.
The standard almond cream recipe—butter, sugar, eggs, almond flour—is a formula for a basic cake. To transform it, you need to disrupt that structure. This involves reducing the components that create structure (egg whites, gluten) and increasing the ones that create tenderness and richness (fat, moisture). Small, deliberate substitutions can completely change the final mouthfeel from crumbly and dry to unctuous and smooth.
These are not just random tips; they are targeted chemical interventions. Using only egg yolks provides fat and emulsifiers without the structural proteins of the egg whites. Crème fraîche adds both fat and acidity, which tenderizes the cream. Powdered sugar dissolves more finely, creating a smoother texture, and a splash of liquor like rum or kirsch inhibits gluten formation. Applying these techniques methodically will give you ultimate control over the final texture.
Your Action Plan: Achieving a Melting Texture
- Replace 25% of the butter with an equal amount of full-fat crème fraîche to add tangy richness and tenderness.
- Use only egg yolks instead of whole eggs for a denser, more custard-like consistency that avoids a spongy texture.
- Substitute one-third of the granulated sugar with powdered (icing) sugar for a finer, less grainy crumb.
- Add one tablespoon of a high-proof spirit like rum or kirsch; the alcohol helps inhibit gluten formation, ensuring a shorter, more tender bite.
- Ensure your almond flour is super-fine and consider sifting it with the sugar to prevent any grittiness.
By systematically de-emphasizing the cake-like structure, you can engineer a filling that is exceptionally silken and luxurious.
Which Cocoa Powder Type Creates the Darkest, Moistest Cakes?
When creating a chocolate almond cream, the choice of cocoa powder is not just about color; it’s a primary driver of moisture and flavor. Not all cocoas are created equal. The key differences lie in their fat content and acidity (pH level), which directly impact the final texture of your cream, just as they do in cakes.
Standard, natural cocoa powder (often 10-12% fat) is acidic and can lend a slightly harsh, sharp chocolate flavor. For a truly rich, moist, and dark filling, the professional’s choice is a high-fat, Dutch-processed cocoa. “Dutching” is an alkalization process that neutralizes the cocoa’s acidity, resulting in a smoother, more mellow, and much darker flavor profile. This lower acidity is crucial in an almond cream, as it won’t react negatively with the fats from the butter and nuts.
More importantly, the fat content is directly correlated with moisture retention. As baking science research demonstrates, a 22-24% fat cocoa powder can lead to a baked good that is perceived as twice as moist as one made with a standard 10% fat version. This additional cocoa butter enriches the almond cream, contributing to that desirable fudgy, melting quality.
A word of caution regarding “black” cocoa powder: while it provides an intense, dramatic black color, it is extremely alkalized and often contains very little fat. Using it as 100% of your cocoa will result in a dry, chalky, and often bitter taste. The professional technique is to use it as a color enhancer. For a deep, dark color without sacrificing texture, blend 25% black cocoa with 75% high-fat Dutch-process cocoa. This gives you the visual impact you desire while preserving the moist, rich texture that is essential for a high-end almond cream.
This careful selection and blending of cocoas is a subtle but powerful tool for elevating your chocolate pastries from good to exceptional.
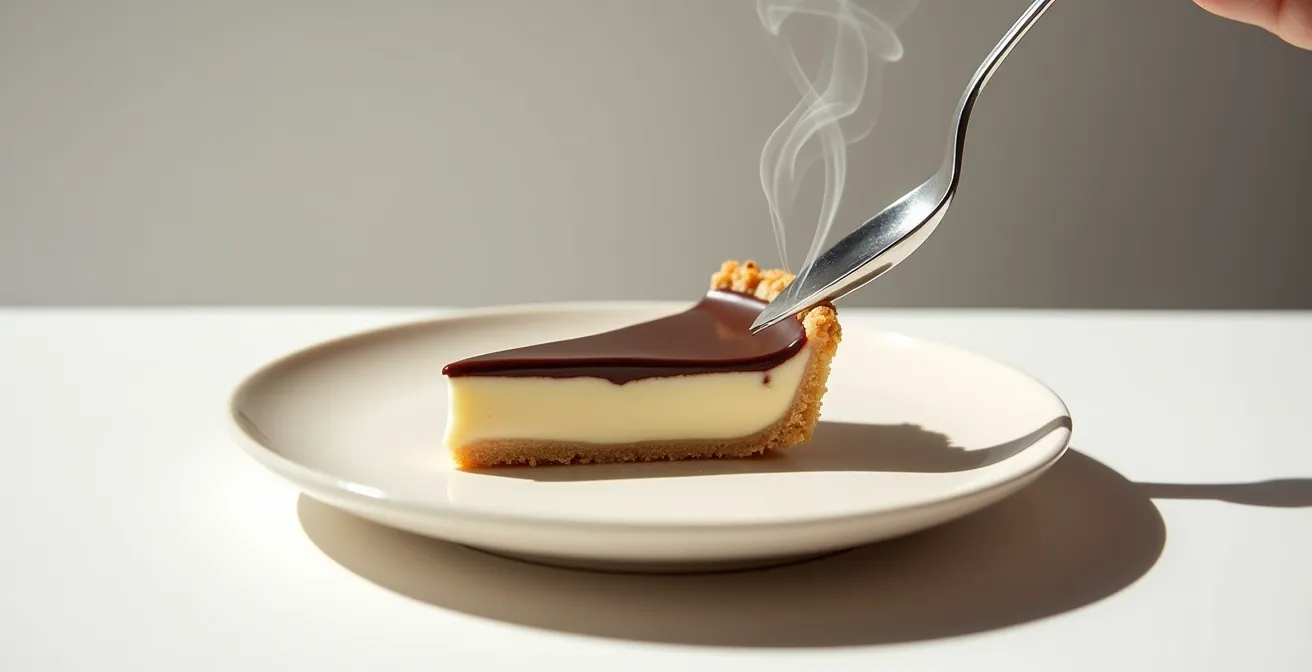
How to Time the Baking of Lava Cakes to the Exact Second?
While the title references lava cakes, the principle for timing a perfect, melting-center almond cream tart is identical: you are baking to a specific textural cue, not to a clock. The goal is to cook the cream just enough for it to set at the edges while leaving the very center soft, wobbly, and almost under-baked. This residual softness, combined with carryover cooking as the tart cools, is what creates the coveted “melting” texture instead of a firm, cakey one.
Relying solely on a timer is a recipe for failure, as every oven has hot spots and temperature fluctuations. The key is to learn to read the visual and physical signs of doneness. A perfectly baked almond cream will not be firm all the way through. It should be visibly puffed and set for about 1-2 inches around the perimeter, but the very center should still jiggle when the pan is gently shaken. This is the moment of truth.
A seasoned professional pastry chef, describing the technique for advanced tarts, gives this essential sensory advice:
The edges of the cream should be puffed and set, but the direct center should still have a distinct jiggle or wobble when the pan is gently shaken.
– Professional Pastry Chef, Advanced Tart Baking Techniques
To achieve this consistently, you must be methodical. First, always use an oven thermometer to know your oven’s true temperature. For a standard 9-inch tart at 350°F (175°C), begin checking for doneness around the 18-minute mark. Look for that set perimeter and a wobbly center, which should move as a single unit, like set gelatin, not in a liquidy wave. The moment you see this, remove the tart from the oven immediately. The residual heat in the pan and filling—a phenomenon known as carryover cooking—will continue to cook the center just enough to be set but still incredibly soft after it has cooled for at least 10-15 minutes.
This “wobble test” is the most reliable indicator that you have successfully navigated the fine line between a raw center and an over-baked, cakey filling.
Key takeaways
- The primary cause of a raw almond cream layer is the thermal insulation from the ganache, which is solved by partially pre-baking the cream.
- Focus on creating a stable emulsion by using room-temperature ingredients and gentle mixing; avoid whipping air into the cream.
- To achieve a “melting” texture, use ingredient swaps that reduce structure and increase richness, such as using only egg yolks or adding crème fraîche.
The Cloche Trick: Keeping Pre-Cut Slices Moist During Service
You have baked the perfect tart: the crust is crisp, the ganache is glossy, and the almond cream has a sublime, melting texture. The final challenge, especially in a professional or entertaining context, is preserving that perfection through slicing and service. A butter- and fat-rich cream is highly susceptible to temperature changes, and a poorly cut slice can ruin the presentation and texture you worked so hard to achieve.
First, temperature is paramount. A tart served straight from the refrigerator will be hard and muted in flavor. The cocoa butter in the chocolate and the butter in the cream need to soften slightly to release their aromas and achieve a silken mouthfeel. As professional service guidelines recommend, allowing a tart slice about 15 minutes at room temperature is enough to restore nearly all of its original, intended texture. To prevent the cut surfaces from drying out during this time, a glass cloche or cake dome is an invaluable tool. It creates a micro-environment that traps just enough humidity to keep the slice pristine.
Second, the slicing itself is a critical technique. A cold knife will drag through the rich cream and ganache, creating a messy, smeared cut. The secret used in high-end pastry kitchens is a hot knife technique. Keep a tall container of very hot water (around 140°F/60°C) nearby. For each cut, dip the blade of a long, thin knife into the water, wipe it completely dry with a clean towel, and make one single, clean, decisive cut. The heated blade melts through the layers rather than dragging, creating flawless, restaurant-quality portions. This ensures the structural integrity and clean appearance of each slice, allowing it to be presented perfectly.
These final touches of professionalism are what truly distinguish an amateur baker from a seasoned pâtissier, ensuring that the last bite is just as perfect as the first.