The key to perfectly timed lava cakes isn’t a stopwatch; it’s a rigorous system that eliminates variables before the cake ever enters the oven.
- Success depends on thermal control—understanding batter temperature, heat conductivity of the vessel, and carryover cooking.
- Failure-proofing techniques, like frozen ganache inserts and precise greasing, guarantee a molten center and clean release under pressure.
Recommendation: Stop guessing with timers and start building a repeatable process from preparation to plating. That is the only path to consistency.
The ticket machine is screaming. Table 12 wants four lava cakes, stat. You grab the ramekins from the oven, flip them, and one sticks. Another is cooked through. Two are perfect. A 50% success rate won’t cut it during a Saturday night rush. For a line cook tasked with sending out dozens of mi-cuits per service, the molten chocolate cake is a high-stakes dessert where a few seconds can mean the difference between a triumphant eruption and a dry, disappointing puck of chocolate cake.
Most advice online offers generic baking times or vague visual cues like “wait until the edges are set.” This is home-baker advice, useless for the brutal consistency demanded in a professional kitchen. You’re told to use a thermometer, but temping 50 individual cakes during service is a logistical nightmare. The secret isn’t found in a better timer or a magic oven setting. It’s about shifting your mindset from a baker to a systems engineer.
The real key to mastering the lava cake to the exact second is to stop focusing on the second hand of the clock altogether. It’s about building a bulletproof, repeatable system that controls every variable—from batter temperature to the thermal conductivity of your baking vessel. This isn’t about baking; it’s about thermal management and service logistics. By controlling the inputs, the output—a perfectly molten center—becomes a predictable, reliable result, not a matter of luck.
This guide will deconstruct the process, providing a systematic approach to produce flawless molten chocolate cakes at scale, service after service. It’s time to build your consistency engine.
For those who prefer a visual starting point, the following video demonstrates the fundamental assembly of a classic lava cake. Our guide will then build upon this foundation with the professional systems required for high-volume service.
To achieve absolute control and consistency, we must break down the operation into its critical components. This article provides a complete system, covering every step from batter preparation and vessel selection to advanced holding and plating strategies for large-scale service. Follow this blueprint to eliminate guesswork and deliver perfection every time.
Summary: A Chef’s System for Perfect Molten Centers
- Frozen vs. Fresh Batter: Which Bakes More Consistently?
- The Ganache Insert Trick: How to Guarantee a Liquid Center?
- Metal Ring vs. Ramekin: Which Conducts Heat for Better Crust?
- The Greasing Mistake That Tears Your Fondant Apart
- How to Hold Molten Cakes During Service Without Overcooking?
- Why Is Cold Vanilla Cream the Perfect Partner for Hot Chocolate Cake?
- How to Serve Molten Chocolate Cakes to 20 Guests Simultaneously?
- The Cloche Trick: Keeping Pre-Cut Slices Moist During Service
Frozen vs. Fresh Batter: Which Bakes More Consistently?
The first point of control in your system is batter temperature. A room-temperature batter and a refrigerated batter are two completely different products from a thermal standpoint. Baking directly from the fridge introduces a significant variable that extends baking time unpredictably. For absolute consistency, batter should ideally be portioned and brought to a consistent, cool room temperature before entering the oven. However, the most reliable system involves baking from frozen, but only if you account for it.
The true enemy of timing is not the oven, but carryover cooking. A lava cake does not stop cooking the moment you pull it from the heat. The residual energy in the ramekin and the outer cake continues to radiate inward. In fact, research shows the internal temperature can rise another 5-10°F after leaving the oven. This is where most cooks fail. They pull the cake when the center seems perfect, only for it to solidify on the pass.
Using frozen, pre-portioned batter or even frozen cakes offers a massive advantage: it creates a larger temperature differential between the outside and the center. The edges can set and form a crust while the core remains deeply frozen, taking much longer to cook. This widens the window for achieving a molten state. The key is to standardize: either always bake from a chilled state (e.g., 1 hour out of the fridge) or always bake from frozen, and then run tests to establish a fixed time for *that specific state*. Inconsistency in starting temperature is the primary source of timing failures.
The Ganache Insert Trick: How to Guarantee a Liquid Center?
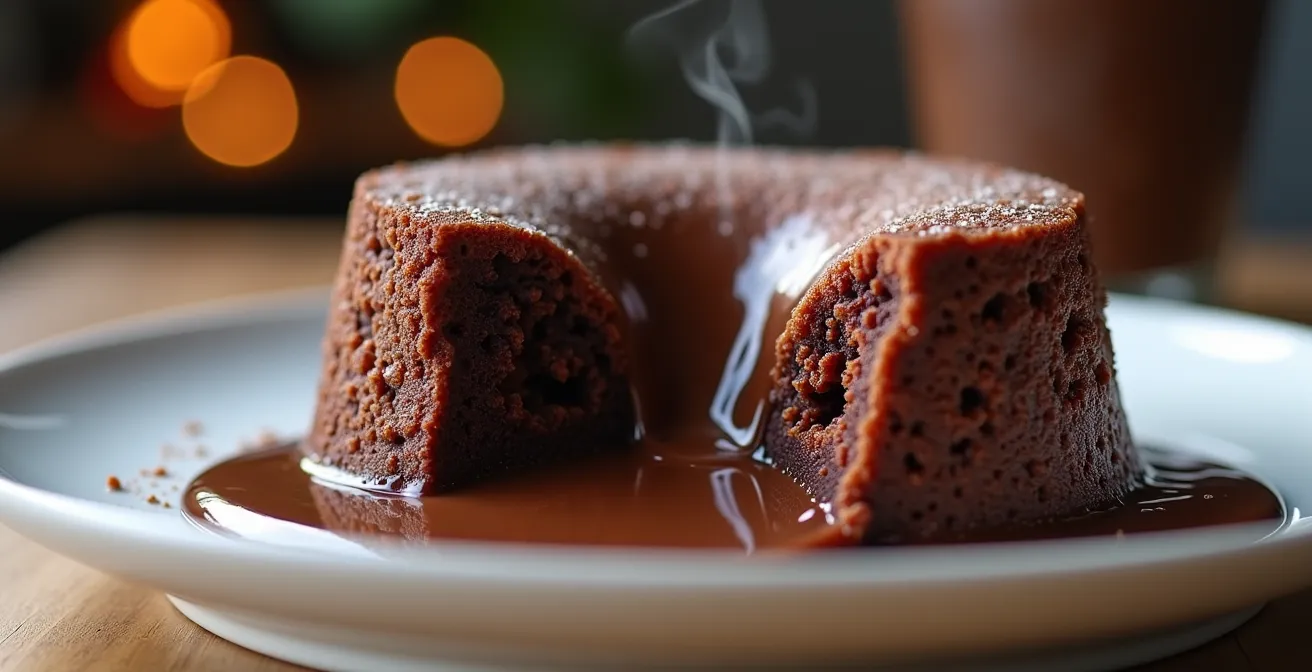
Relying on underbaking the batter to create a “molten” center is a high-risk strategy. It’s a game of seconds where the line between liquid and solid is razor-thin. The professional solution is to stop gambling and start guaranteeing. The ganache insert trick is the single most effective technique for failure-proofing your lava cakes. It ensures a perfectly liquid, decadent core every single time, regardless of minor variations in baking time.
The principle is simple: instead of creating a liquid center by undercooking, you embed a pre-made, stable liquid center into the batter. A frozen ball of chocolate ganache is placed in the middle of the ramekin. As the cake bakes, the batter cooks fully around it, forming a stable crust and crumb, while the ganache insert simply melts into a luscious, guaranteed lava flow. This decouples the “doneness” of the cake from the “liquidity” of the center, removing the primary point of failure.
This method not only ensures a perfect result but also adds a layer of richness and flavor complexity. You can customize the ganache with different chocolate percentages, liqueurs, or extracts to create signature desserts. It transforms the lava cake from a technical challenge into a creative platform. Follow this procedure to implement the system.
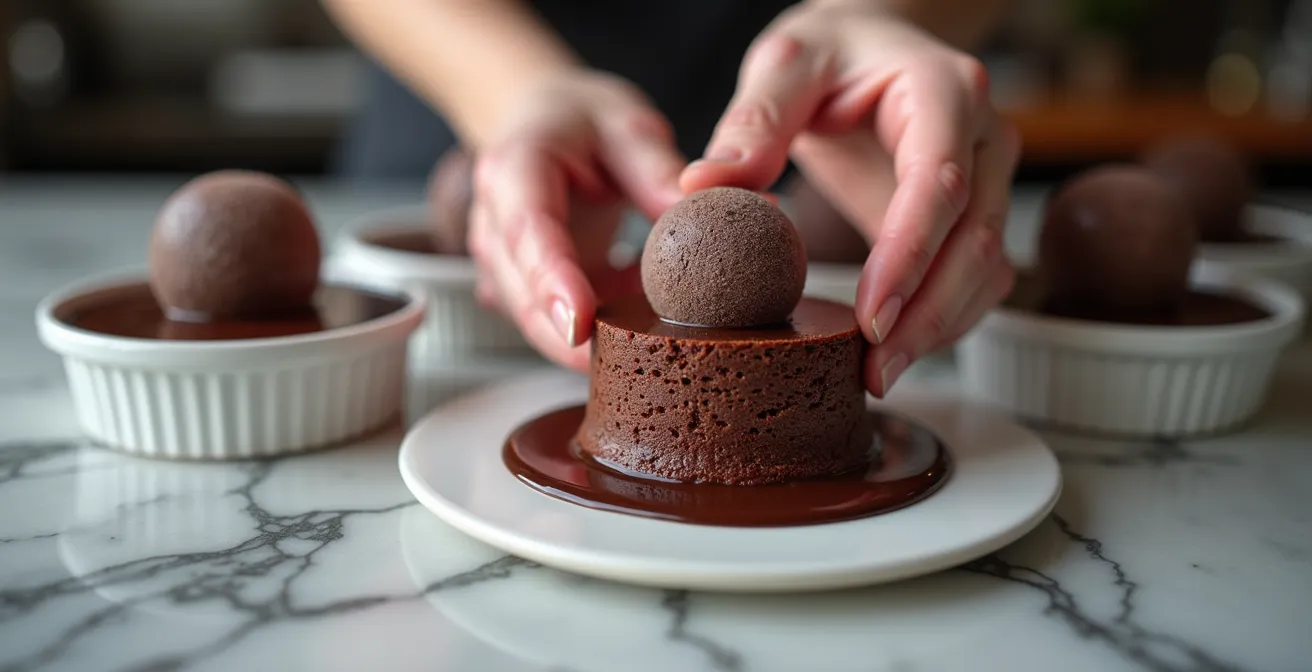
Action Plan: The Ganache Insert System
- Formulate Ganache: Prepare your ganache using a 1:1 or 2:1 chocolate-to-cream ratio. The firmer the ganache, the easier it is to handle when frozen.
- Portion and Freeze: Scoop the ganache into 1 to 2 tablespoon-sized balls. Place them on a sheet pan lined with parchment paper and freeze until completely solid.
- Assemble: Fill each greased ramekin halfway with cake batter. Place one frozen ganache ball directly in the center.
- Encase and Conceal: Top with the remaining batter, ensuring the ganache ball is fully submerged. Any exposed ganache can compromise the structure.
- Bake and Serve: Bake as required. The cake should be cooked through, but the center will be perfectly molten. A bake time of 11 minutes at 425°F is a solid starting point for testing.
Metal Ring vs. Ramekin: Which Conducts Heat for Better Crust?
The vessel you bake in is not just a container; it’s an active tool in your thermal control system. The material directly dictates how quickly and evenly heat is transferred to the batter, which fundamentally changes the texture of the final crust. For a high-volume service, the choice between a classic ceramic ramekin and a stainless steel or aluminum ring mold is a strategic one.
Ceramic is an insulator. It heats slowly and gently, producing a softer, more uniform, cake-like crust. This can be desirable, but it also means the baking process is slower and the temperature gradient from edge to center is less steep. Metal, on the other hand, is a powerful conductor. It transfers heat rapidly, creating a thin, crisp shell that offers a dramatic textural contrast to the molten interior. This speed is a significant advantage in a restaurant setting, as it can shave precious minutes off bake times.
As the following data shows, the difference in thermal performance is not subtle. It’s a fundamental physical property that you must leverage.
| Material | Thermal Conductivity (W/m·K) | Heat Transfer Speed | Crust Result |
|---|---|---|---|
| Aluminum (metal ring) | 205 | Very Fast | Thin, crisp shell with maximum texture contrast |
| Ceramic (ramekin) | 1.5 | Slow, gentle | Uniform, cake-like crust |
| Borosilicate Glass | 1.1 | Very Slow | Soft, even browning |
This data makes the choice clear for a professional environment focused on speed and texture. As confirmed by an analysis of thermal conductivity in cooking, aluminum’s ability to heat up quickly facilitates an even, rapid bake. For a distinct crust that holds up to plating and a faster ticket time, metal ring molds are the superior choice. They provide the control and efficiency required for service.
The Greasing Mistake That Tears Your Fondant Apart
A perfect lava cake that won’t release from its mold is a total failure. Every cook has felt the heart-sinking moment of flipping a ramekin only to have half the cake tear away and stick to the bottom. As one chef noted in a moment of frustration, “Only two of mine released… My guess is that the ramekins were under-greased.” This isn’t a guess; it’s a diagnosis of a systemic failure in preparation.
Only two of mine released from the ramekins when I flipped them over (but they were all still delicious). My guess is that the ramekins were under-greased, especially since two released easily and were fully baked.
– Tessa Arias, Handle the Heat
The common “butter and flour” method is a recipe for disaster. The milk solids in butter can burn and act like glue, while flour can leave a pasty white residue on the dark chocolate cake. The professional method is a two-part system designed for a flawless release every time. It involves using a specific fat and a non-stick coating that works with the chocolate, not against it.
This is not just “greasing”; it’s creating a microscopic, non-stick barrier. The following steps are not suggestions; they are standard operating procedure for a zero-failure release system.
- Step 1: Use Clarified Butter (Ghee). Ghee has no milk solids, which means it has a much higher smoke point and won’t burn or stick to the ramekin. It creates a pure fat layer.
- Step 2: Brush Upwards. Apply the ghee with a pastry brush using deliberate upward strokes. This aligns the fat with the direction the cake will travel as it releases, guiding it out.
- Step 3: Chill to Solidify. Briefly chill the greased ramekins in the refrigerator. This solidifies the fat into a hard, slick coating that is more robust than a liquid layer.
- Step 4: Dust with Cocoa Powder. Never use flour. Dust the chilled, greased ramekin thoroughly with high-quality cocoa powder. It will adhere to the solidified ghee and won’t affect the color or flavor of the cake.
- Step 5: Create a “Ball Bearing” Layer. Tap out all excess cocoa powder. The fine layer that remains acts like microscopic ball bearings, allowing the cake to slide out cleanly upon inversion.
How to Hold Molten Cakes During Service Without Overcooking?
The greatest challenge of a lava cake in a restaurant is timing its completion with the guest’s readiness for dessert. Baking to order is ideal but logistically difficult. So, can you hold a finished lava cake without the center congealing or the edges turning to rubber? The answer is yes, but it requires precise temperature control. A standard heat lamp is a death sentence, as its intense, direct heat will continue to cook the cake rapidly.
The correct tool for this job is a professional warming drawer or a convection oven set to its lowest “hold” temperature, typically around 140-150°F (60-65°C). This low, ambient heat is just enough to keep the cake at a perfect serving temperature without activating significant carryover cooking. This method can successfully hold a cake for up to 30 minutes, a crucial buffer during a busy service.
However, a more efficient system for high-volume service is the par-baking method. This approach splits the process to maximize efficiency during the rush.
Case Study: The 80/20 Par-Baking Restaurant Method
Many professional kitchens utilize an 80/20 par-baking technique to streamline service. According to a strategy outlined for baking lava cakes for a crowd, cakes are baked 80% of the way through ahead of time, then chilled rapidly. When an order comes in, the par-baked cake is “flashed” in a hot oven for just 2-3 minutes—long enough to remelt the center and heat it through without any risk of overcooking. This method reduces the final bake time from 12 minutes to under 3, a massive gain in efficiency. The batter can be prepared and held in muffin tins, refrigerated for up to a day, or frozen for up to a month, providing maximum flexibility for prep.
Why Is Cold Vanilla Cream the Perfect Partner for Hot Chocolate Cake?
The pairing of a hot, molten chocolate cake with a cold scoop of vanilla ice cream or a dollop of chilled crème anglaise is a classic for a reason. It’s not just a tradition; it’s a deliberate application of food science to create a more dynamic and balanced sensory experience. The magic lies in the temperature contrast and its effect on our perception of taste.
A molten chocolate cake is intensely rich, sweet, and served hot, ideally between 120-130°F (49-54°C). At this temperature, our taste receptors are highly sensitive to sweetness. Serving it with a warm or room-temperature sauce would be cloying and overwhelming. A cold element, however, acts as a palate cleanser with every bite. The cold mutes the intensity of the sugar, allowing the deeper, more complex notes of the chocolate to shine through.
This phenomenon is well-documented in sensory science. It is a known principle that temperature dramatically impacts how we perceive flavors, especially sweetness.
Cold temperatures suppress the perception of sweetness. Therefore, a cold cream tastes refreshing and ‘cuts through’ the richness of the cake, whereas a room-temperature cream would taste cloying and heavy.
– Food Science Research, Temperature’s Effect on Taste Perception Study
Beyond taste, the textural contrast is equally important. The unctuous, flowing lava and soft cake crumb are perfectly complemented by the crisp coldness and dense creaminess of ice cream or the silky smoothness of a chilled sauce. This multi-sensory contrast—hot vs. cold, soft vs. firm, rich vs. refreshing—is what elevates the dessert from a simple cake to a complete, memorable experience. The cold component isn’t a garnish; it’s a structural necessity.
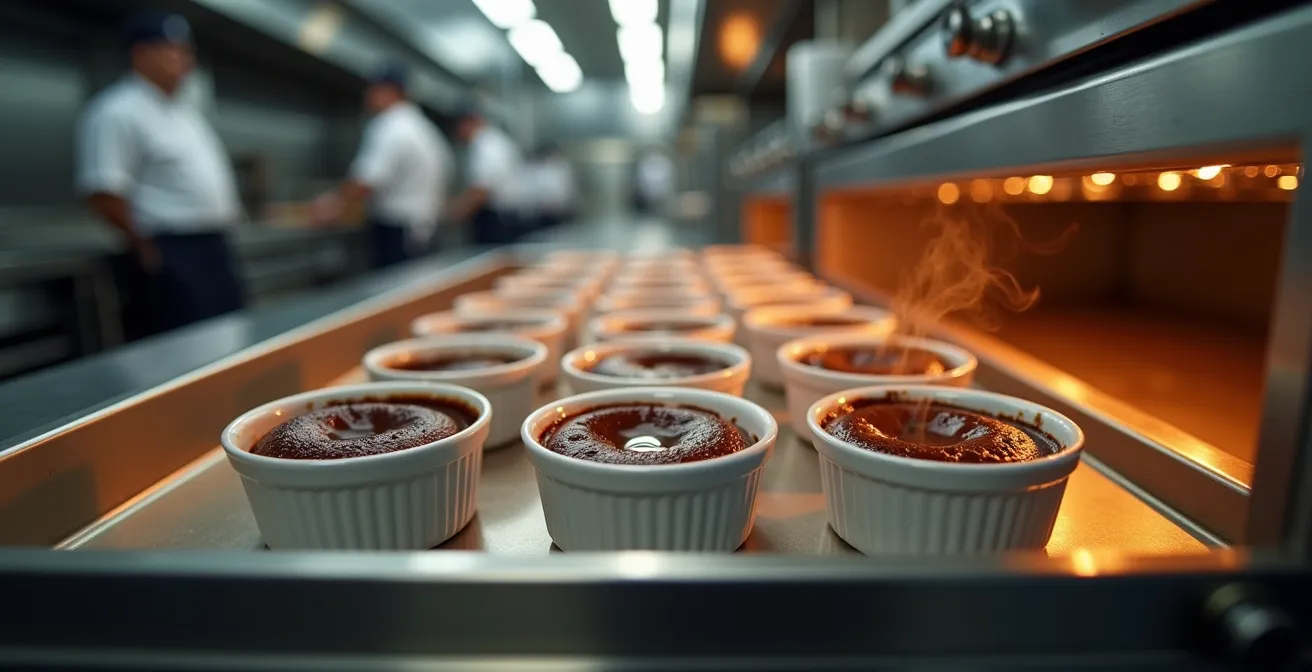
How to Serve Molten Chocolate Cakes to 20 Guests Simultaneously?
Serving a single table of four is a challenge; serving a party of 20 is a military operation. This requires a flawless mise en place and a staggered baking strategy. You cannot bake 20 cakes in a single batch and expect them to be perfect. The first cakes out of the oven will be cold and congealed by the time the last ones are plated. The solution is the “Wave Plating” strategy.
This system involves splitting the order into manageable waves—for example, two waves of 10 cakes. By staggering their entry into the oven, you create a continuous flow of perfectly baked cakes, allowing the plating team to keep pace without being overwhelmed and without any cake dying on the pass. A convection oven is highly recommended for this, as it provides the even heat distribution necessary for batch baking, but remember to reduce the temperature by about 25°F to compensate for the faster cook time.
This is a logistical plan that must be executed with precision. Every second counts, and every station must be ready.
- Advance Prep: All 20 ramekins are prepared with batter and chilled. This can and should be done hours in advance.
- Mise en Place: The plating station is fully set up. All 20 plates, garnishes (like mint sprigs or berries), sauces, and ice cream are ready for immediate service.
- Staggered Timers: Use multiple digital timers. Set one for Wave 1 (10 cakes).
- Launch Wave 1: Place the first 10 cakes in the preheated convection oven and start the timer.
- Launch Wave 2: Exactly 5-6 minutes after Wave 1 begins (roughly the halfway point), place the second set of 10 cakes in the oven on a separate timer.
- Plate Wave 1: As Wave 1’s timer goes off, pull them. A dedicated person should immediately begin inverting and plating them. The rest of the team adds garnishes.
- Serve and Finish: Wave 1 is sent out immediately. By the time they reach the table, Wave 2 is finishing its final minutes in the oven, ready for immediate plating.
Key Takeaways
- System Over Timing: Consistency comes from a controlled, repeatable process, not from watching a clock.
- Master Thermal Control: Your success depends on managing batter temperature, vessel conductivity, and carryover cooking.
- Failure-Proof Your Steps: Use techniques like ganache inserts and professional greasing to eliminate common points of failure before they happen.
The Cloche Trick: Keeping Pre-Cut Slices Moist During Service
Let’s be perfectly clear. The idea of pre-cutting a molten chocolate cake and holding it under a cloche (a glass dome) is an absolute non-starter. It is a fundamental misunderstanding of what makes the dessert special. This is not a technique; it’s a sacrilege that destroys the entire experience for the guest.
You must never pre-cut a lava cake or hold it under a cloche: it ruins the ‘magic moment’ of the eruption, causes the center to bleed out and congeal, and makes the crust soggy from trapped steam.
– Professional Pastry Chef Guidelines, Restaurant Service Best Practices
The “magic moment” is the guest breaking the crust and seeing the lava flow. Pre-cutting robs them of this. Furthermore, trapping a hot, steamy cake under a cloche creates a humid environment that turns the crisp outer shell into a soggy, wet mess. The exposed lava will quickly cool, oxidize, and congeal into a sad, unappetizing puddle. It is, in short, a way to ruin a perfectly good dessert.
The correct, albeit limited, preservation technique is not about holding a *cut* cake, but about slowing the heat loss of a *whole* cake the moment it’s plated. This is achieved with the Hot Plate Method, a simple trick that can buy you a few crucial minutes on the pass.
- Step 1: Pre-heat Plates. Use a warming drawer or a low oven to heat your serving plates to around 120°F (49°C).
- Step 2: Plate Immediately. Remove a hot plate just before you are ready to invert the cake.
- Step 3: Invert onto Heat. Invert the freshly baked lava cake directly onto the pre-heated plate.
- Step 4: Slow Heat Loss. The hot plate acts as a thermal buffer, slowing the rate at which the cake loses heat from the bottom.
- Step 5: Extend Liquid State. This simple action can keep the center molten for an additional 5-7 minutes, a vital window for coordinating service.
Stop looking for shortcuts and start building your system. Control the variables, execute with precision, and you will never have to guess at the timing of a lava cake again. That is how you achieve consistency under pressure.
Frequently Asked Questions About How to Time the Baking of Lava Cakes to the Exact Second?
Can I prepare lava cakes ahead for a dinner party?
Yes, absolutely. The best method is to assemble the cakes completely in their greased ramekins, cover them, and refrigerate until you are ready to bake. This is a core part of a professional mise en place. Be aware that baking from a cold state will require a slightly longer baking time, so you must test and adjust your timing accordingly. Prepping ahead allows you to bake them fresh on demand.
Should I use a convection oven for multiple cakes?
For batch baking, a convection oven is superior. The fan circulates hot air, providing a more even and consistent heat distribution across all the cakes, which is crucial when baking more than a few at a time. As a rule of thumb, reduce the recipe’s recommended temperature by 25°F (about 15°C) and monitor closely, as convection baking typically shortens the bake time by 1-2 minutes.
What if some guests aren’t ready when cakes come out?
This is a common service issue. The professional solution is a warming drawer or holding cabinet set to a low temperature, around 140°F (60°C). This temperature is warm enough to maintain the cake’s heat and molten center but low enough to prevent significant carryover cooking. A cake can be held this way for up to 30 minutes without compromising quality, providing a critical buffer to coordinate with the dining room.