
Achieving a flawless entremet cross-section is not about following a recipe; it’s about mastering the physics of temperature, the chemistry of setting agents, and the mechanics of cutting.
- Each layer’s stability depends on precise freezing and gelatin ratios, which create structural integrity.
- A perfect, smear-free slice is the result of controlling the entremet’s core temperature and using impeccable knife technique.
Recommendation: Stop thinking like a baker and start thinking like an engineer. Control every thermal and structural variable from assembly to the final cut.
In every pastry competition, there is a moment of truth. It is not the first glance at a glistening, perfect entremet. It is the moment the judge’s knife makes the first cut. What is revealed inside? Is it a chaotic blend of colors and textures, a cross-section marred by smears and compression? Or is it a masterpiece of geometric precision, with razor-sharp lines separating distinct, vibrant layers? As a judge, I have seen countless promising creations fail at this final hurdle. The common advice—freeze your layers, use a hot knife—is not wrong, but it is dangerously incomplete. It’s the “what,” not the “why.”
The world of high-end patisserie extends beyond entremets to other feats of precision, like molded bonbons or towering tiered cakes. The principles, however, remain the same. Many aspiring pâtissiers believe the secret lies in a magical recipe or an expensive ingredient. They focus on flavor combinations while neglecting the fundamental architecture of their creation. They follow steps without understanding the underlying science, leading to frustrating and inconsistent results. This is where the amateurs stop and the professionals begin.
But what if the key to a perfect cross-section wasn’t a secret ingredient, but a shift in mindset? What if you treated your entremet not as a cake, but as a meticulously engineered structure? The real secret is mastering the thermal engineering of freezing and thawing, understanding the structural integrity required of each component, and executing a cut with mechanical precision. This guide will deconstruct the process, moving beyond simple instructions to reveal the scientific principles that separate a good dessert from a prize-winning work of art. We will dissect each stage, from layer assembly to the final, flawless slice.
This article provides a detailed roadmap for mastering the art and science of entremet construction. Explore the sections below to understand the critical techniques that ensure a perfect, competition-worthy result every time.
Summary: The Engineering Behind a Perfect Entremet Slice
- Why Must You Freeze Each Layer Before Pouring the Next?
- Mousse vs. Jelly: How to Stack Textures Without Sliding?
- Hot Knife vs. Ultrasonic Cutter: How to Get Smear-Free Slices?
- The Thawing Mistake That Makes Your Glaze Slide Off
- Natural Colors: How to Create Contrast Without Artificial Dyes?
- How to Achieve Mirror-Like Shine on Your Molded Bonbons?
- How to Aerate Chocolate Mousse Without Losing Stability?
- How to Build a 3-Tier Chocolate Cake That Survives Transport?
Why Must You Freeze Each Layer Before Pouring the Next?
This is the most fundamental rule, yet it is consistently misunderstood. The purpose of freezing is not merely to make a layer “firm.” It is a critical exercise in thermal engineering. When you pour a liquid mousse or crémeux (often at room temperature or slightly warm) onto a layer that is merely chilled, a disastrous heat transfer occurs. The top surface of the bottom layer melts, causing the two components to bleed into each other. The result is a blurry, indistinct line—an immediate disqualification in any serious evaluation.
A properly frozen layer acts as a thermal barrier. By bringing each component to a deep freeze, you ensure that when the next layer is poured, it begins to set almost instantly upon contact. This creates a microscopic, but structurally significant, boundary. This prevents any molecular migration between layers, preserving the color and textural integrity of each. The goal is not just solidity; it is the complete prevention of dissolution and blending. An amateur chills; a professional flash-freezes.
For this to work, the freezing must be thorough. A minimum of three hours in a deep freezer is required for a standard mousse layer to achieve the necessary thermal stability. The entire assembled entremet must then be frozen overnight, typically for 8 to 12 hours. This final, deep freeze is not for layering but for overall structural stability. It ensures the entire structure is a single, solid block, rigid enough to be unmolded cleanly and withstand the application of a warm mirror glaze without collapsing.
Mousse vs. Jelly: How to Stack Textures Without Sliding?
Stacking layers of varying densities is an exercise in structural engineering. A common failure is “layer slide,” where a dense jelly or fruit insert shifts or sinks within a lighter mousse upon slicing. This happens because the layers lack mechanical grip and sufficient internal structure. The solution lies in managing the formulation of each component, specifically the gelatin content, to create a stable, cohesive stack.
A jelly insert must be firm enough not to deform under the weight of layers above it, but it also needs a surface that a mousse can adhere to. If the jelly is too slick, the mousse will simply slide off. Some chefs create mechanical grip by lightly spraying the frozen jelly with cocoa butter, creating a micro-textured surface for the mousse to lock onto. However, the primary factor for stability is the internal structure provided by a gelling agent. Different layers demand different levels of support, and adjusting the gelatin ratio is a non-negotiable step for building a stable entremet.
The following table, based on professional pastry analysis, outlines the gelatin requirements for different layer types. As the data shows, a fruit jelly, which carries a high risk of slippage, requires a significantly higher gelatin ratio to achieve a “grippable” surface compared to a lighter mousse. Mastering these ratios is essential for ensuring your layers remain perfectly aligned.
| Layer Type | Gelatin Ratio | Texture Goal | Risk Level |
|---|---|---|---|
| Fruit Jelly | 2.5-3% gelatin | Firm, grippable surface | High slip risk if under 2% |
| Chocolate Mousse | 1.5-2% gelatin | Soft, airy structure | Medium stability |
| Bavarian Cream | 2-2.5% gelatin | Creamy but stable | Low slip risk |
Understanding this data from sources like A Theory of Entremet Desserts is what separates hopeful attempts from engineered successes. You must build your entremet with the knowledge that each layer is a structural element, not just a flavor.
Hot Knife vs. Ultrasonic Cutter: How to Get Smear-Free Slices?
The final cut is the performance. All the meticulous work of layering and freezing can be undone in a single, poorly executed slice. The enemy here is friction. A cold or dry knife blade drags microscopic particles from one layer to the next, creating a smear. The goal is shear-free slicing, where the blade passes through the product with minimal resistance. While high-end pastry shops may use ultrasonic cutters that vibrate at 20,000 times per second to eliminate friction, a perfect slice is achievable with a simple long knife and flawless technique.
The first variable is the temperature of the entremet itself. It must be cut while still partially frozen. Expert consensus dictates a core temperature between -5°C and -7°C. At this temperature, the entremet is firm enough to hold its shape perfectly but soft enough that its frozen crystalline structure won’t shatter under the pressure of the blade. If it’s too warm, it will compress; if it’s too cold, it will crack.
The second variable is the knife. Heating the blade under hot running water is the standard method. The heat melts a micro-thin layer of the entremet upon contact, creating a liquid barrier that allows the knife to glide through without friction. However, the protocol must be exact. The blade must be heated for at least 30 seconds, then wiped completely dry to prevent water droplets from marring the surface. The cut itself must be a single, confident downward motion. Any sawing action will create horizontal smear lines. Finally, and this is the step most often skipped, the blade must be wiped clean and reheated between every single slice. Any residue from the previous cut will ruin the next.
The Thawing Mistake That Makes Your Glaze Slide Off
You have created a structurally sound entremet with perfect layers and a flawless mirror glaze. You move it from the freezer to the refrigerator to thaw, and a disaster occurs: condensation forms on the surface, and the beautiful glaze begins to weep, or worse, slide off entirely. This is not a failure of the glaze; it is a failure of thermal management during the thawing process. The enemy is the dew point—the temperature at which atmospheric moisture condenses onto a cold surface.
When you transfer a deeply frozen entremet (-18°C) directly to a humid refrigerator environment (around 4°C), the vast temperature difference causes water vapor in the air to instantly turn to liquid on the cake’s surface. This layer of water gets trapped between the glaze and the frozen mousse, breaking the bond and causing the glaze to slip. This is the single most common reason for a perfect glaze to fail after application.
The professional solution is a process that allows for sublimation. Before moving the entremet to the refrigerator, it must be left unwrapped in the freezer for a short period. As a professional guide on entremet theory confirms, allowing the entremet to sit for 30-60 minutes unwrapped in the freezer lets any surface ice crystals sublimate—turn directly from solid ice to gas—bypassing the liquid stage. This leaves the surface of the glaze bone-dry before it is transferred to the fridge. This simple, yet crucial, step in thermal engineering ensures that no condensation layer can form, preserving the integrity and shine of your glaze all the way to the table.
Natural Colors: How to Create Contrast Without Artificial Dyes?
Visual impact in an entremet is driven by contrast. Sharp, distinct layers are one part of the equation; vibrant, contrasting colors are the other. While artificial dyes offer potent color, a truly sophisticated palette relies on natural ingredients. The challenge is that natural colorants are often less stable and can appear dull. The secret to unlocking their vibrancy lies not in adding more, but in understanding and manipulating their chemical properties, particularly their reaction to pH levels.
Many natural pigments found in fruits and vegetables are anthocyanins, which act as natural pH indicators. For instance, a puree made from purple berries might yield a dull, muted color on its own. However, introducing a small amount of acid, such as lemon juice, can dramatically shift the pH and transform the color into a brilliant, jewel-toned magenta. Conversely, adding an alkaline ingredient like baking soda would shift it towards a blue or even green hue. This is chemistry, not cooking.
Beyond pH, contrast can be achieved through ingredient selection. A layer of dark chocolate mousse, made even blacker with a touch of activated charcoal, creates a dramatic, dark canvas. When juxtaposed with a vibrant, acid-adjusted raspberry jelly or a bright yellow passionfruit crémeux (whose color comes from carotenoids, which are not pH-sensitive), the visual contrast is striking. The artistry lies in pairing these elements, creating a visual story told through natural chemistry that is far more impressive than any artificial color could achieve.
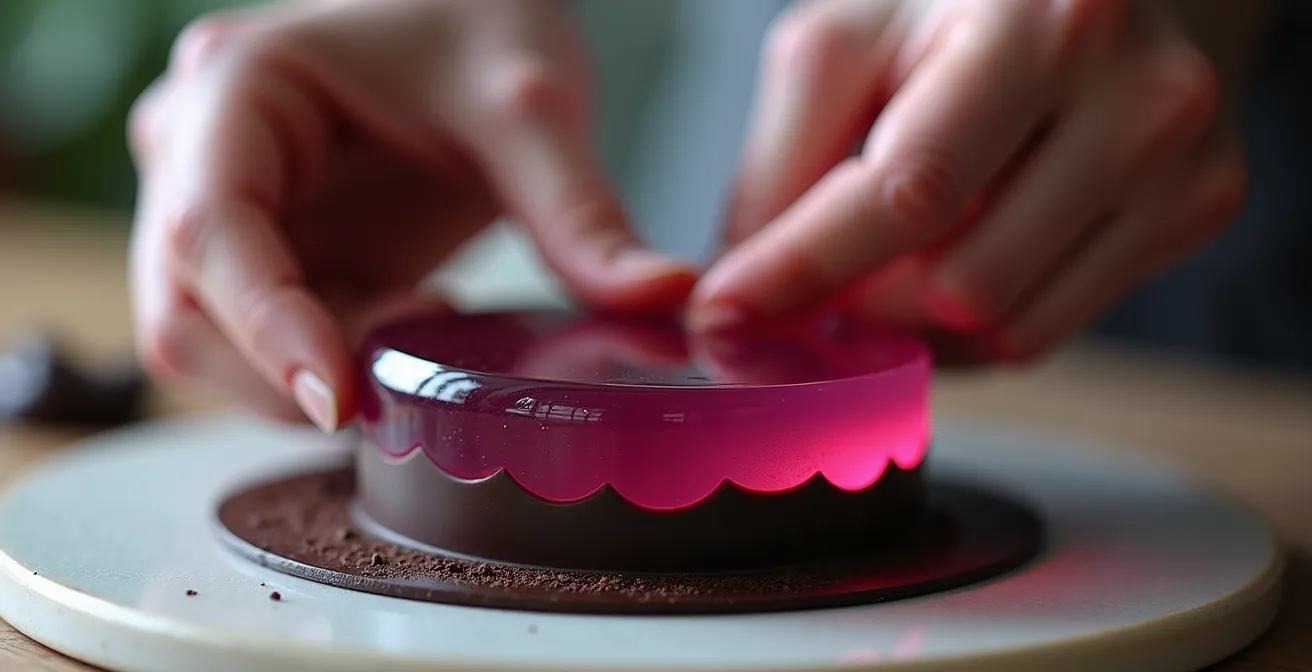
As the image demonstrates, the careful placement of a translucent berry gel, its color intensified by scientific principles, onto a dark base creates a breathtaking effect. This is the level of detail that elevates a dessert to a work of art.
How to Achieve Mirror-Like Shine on Your Molded Bonbons?
While not an entremet, the pursuit of a perfect finish on a molded chocolate bonbon shares the same obsession with precision and control. A mirror-like shine is the hallmark of a master chocolatier, and it is not a matter of luck. It is a direct result of a perfectly controlled crystalline structure in the cocoa butter, impeccable mold preparation, and strict environmental management. Any deviation results in a dull, scuffed, or bloomed appearance.
First, the chocolate itself must be perfectly tempered. This process encourages the formation of stable Type V beta crystals, which are small, dense, and reflect light uniformly, creating the shine. For a mirror glaze or shell, chocolatiers know that maintaining a precise working temperature is critical. Then there is the environment. As the Professional Chocolatier Institute warns, humidity is the enemy of shine:
Ambient humidity above 50% can interfere with the formation of stable Type V cocoa butter crystals during tempering, leading to a dull finish or bloom.
– Professional Chocolatier Institute, Temperature and Humidity Control in Chocolate Work
Even with perfect chocolate and a controlled environment, the shine can be ruined by the mold. The surface of your bonbon will only be as perfect as the surface of the polycarbonate cavity it was cast in. Any microscopic scratches, smudges, or residue on the mold will be perfectly transferred to the chocolate. This requires a fanatical approach to mold preparation.
Action Plan: Polycarbonate Mold Preparation for Flawless Shine
- Polish each cavity with lint-free cotton in circular motions until it is perfectly clear and squeaks to the touch.
- Inspect the polished molds under a bright, direct light to identify any microscopic scratches or lingering residue; these will transfer directly to the chocolate’s surface.
- Gently warm the molds to approximately 26-27°C before pouring in the tempered chocolate to prevent “thermal shock,” which can cause dulling.
- After filling, tap the molds firmly but gently on the work surface to release any trapped air bubbles that could mar the finished surface before setting.
How to Aerate Chocolate Mousse Without Losing Stability?
A chocolate mousse in an entremet must perform two contradictory functions: it must be light and airy to provide a luxurious texture, yet strong and stable enough to support other layers without collapsing. This delicate balance is determined entirely by the aeration method used as its base. Simply folding whipped cream into melted chocolate will create a delicious dessert, but it will lack the structural integrity required for a multi-layered cake.
Professional pâtissiers rely on stabilized foam bases, typically using cooked sugar syrups to create either a pâte à bombe (with egg yolks) or an Italian meringue (with egg whites). The 121°C sugar syrup partially cooks the eggs, creating a much more stable and robust foam structure than one made with raw eggs. This stability is what allows the mousse to be both light in texture and strong in function.
The choice between these methods is a strategic one, based on where the mousse will be placed in the entremet. A pâte à bombe base creates a richer, denser, and incredibly stable mousse, making it ideal for the foundational bottom layer that must support the most weight. An Italian meringue base produces a lighter, more delicate mousse, better suited for top layers where structure is less of a concern. The table below compares the key characteristics of these professional techniques.
| Method | Base Ingredients | Stability Level | Best Use |
|---|---|---|---|
| Pâte à Bombe | Egg yolks + 121°C sugar syrup | Very High – supports heavy layers | Bottom/middle layers |
| Italian Meringue | Egg whites + 121°C sugar syrup | Medium – lighter structure | Top layers only |
| Swiss Meringue | Egg whites + sugar heated to 71°C | Medium-High | Versatile placement |
Regardless of the method, the final folding technique is paramount. The whipped cream and chocolate base must be folded into the aerated base gently with a large spatula, cutting through the middle and bringing the contents from the bottom up and over. The goal is to combine the ingredients in as few movements as possible to minimize the loss of precious air volume.
Key Takeaways
- Perfection in entremets comes from engineering, not just baking. Control temperature, structure, and mechanics.
- Freezing isn’t just for firmness; it’s a thermal barrier to prevent layers from bleeding into each other.
- A clean cut requires a partially frozen entremet (-5°C to -7°C) and a hot, clean knife for every single slice to prevent smearing.
How to Build a 3-Tier Chocolate Cake That Survives Transport?
Building a multi-tiered cake is the ultimate test of structural integrity. The principles are the same as for an entremet, but the stakes are higher due to the immense weight and forces involved. A tiered cake that collapses during transport is a catastrophic failure of engineering. Success depends on two key elements: internal support systems and strict temperature control during movement.
The first line of defense is the “ganache dam.” This is a thick ring of very firm ganache (made with at least 70% cocoa chocolate for maximum solidity) piped around the edge of each cake layer. This dam is chilled until completely rigid before any softer filling, like mousse or cream, is added to the center. This creates a strong retaining wall that prevents the soft filling from squishing out under the weight of the layers above. The layers are then stacked while the dams are still cold and firm, creating a solid, stable column.
However, even the best internal structure will fail if the cake is transported at the wrong temperature. As the cake warms, the butter in the cake and the fats in the ganache begin to soften, compromising the entire structure. The cake becomes vulnerable to vibrations and momentum changes during transit. To prevent this, the entire assembled cake must be thoroughly chilled. As documented by professional bakery guides, professional cake transporters maintain assembled cakes at a 2-4°C core temperature during transit. This keeps the butter and ganache in a solid, rigid state, ensuring the cake arrives at its destination in perfect condition. Transporting a tiered cake at room temperature is simply not an option for a professional.
By internalizing this engineering mindset, you move beyond simply following recipes. You begin to control the outcome, guaranteeing the flawless, razor-sharp cross-sections that define a true master of the craft. Begin today by analyzing your next creation not for its flavor, but for its structural integrity and thermal plan.