Sous-vide tempering is not a shortcut; it is a high-precision instrument for dictating chocolate’s final crystalline structure.
- It delivers sub-degree temperature control, preventing the accidental destruction of the vital Beta-V crystals essential for snap and gloss.
- It creates a closed thermal system that allows you to conquer environmental challenges like ambient heat and humidity, ensuring reproducibility.
Recommendation: Stop following recipes and start architecting thermal protocols. This is the key to achieving absolute control and unlocking consistent, professional-grade results.
For any serious chocolatier or kitchen technologist, the inconsistency of chocolate tempering can be a source of profound frustration. One day yields a batch of perfectly glossy, snappy bonbons; the next, using the same technique, results in dull, streaky failure. Traditional methods like tabling, seeding, or even using a microwave rely heavily on manual skill, ambient conditions, and a fair amount of intuition. They work, but they are susceptible to countless variables, leaving quality to chance.
But what if the objective wasn’t simply to “get it right,” but to engineer a system where failure is a statistical improbability? This is the point where we transition from pure artistry to applied science. The sous-vide method, often misunderstood as a simple “hack” for home cooks, is in fact a laboratory-grade tool for mastering thermal inertia and targeted crystal nucleation. It offers a level of control that manual methods cannot replicate, turning the volatile art of tempering into a predictable, repeatable protocol.
This guide deconstructs the science behind sous-vide tempering. We will move beyond the basic steps to explore the molecular dynamics at play. You will learn not just how to execute the process, but why it works, how to read its results with forensic precision, and how to use it to solve complex problems—from rescuing over-thickened chocolate to producing flawless results in the middle of a summer heatwave. This is not just another tempering method; it’s a new way of thinking about chocolate.
To achieve this level of mastery, we will dissect the entire process. The following sections provide a complete protocol, from understanding the fundamental science to deploying advanced techniques for troubleshooting and environmental control.
Table of Contents: A Protocol for Flawless Chocolate Crystallization
- Why Is Tempering Essential for Snap and Shelf Life?
- How Does Roasting Temperature Define the Final Chocolate Note?
- Why Overshooting by 1°C Destroys Your Beta Crystal Structure?
- The Knife Test: How to Read the Streaks in 3 Minutes?
- How to Achieve Mirror-Like Shine on Your Molded Bonbons?
- Wheel Machine vs. Hand Tempering: Is the Investment Justified?
- How to rescue “Over-Tempered” Thick Chocolate with a Heat Gun?
- How to Temper on a Hot Summer Day Without Air Conditioning?
Why Is Tempering Essential for Snap and Shelf Life?
Tempering is the controlled manipulation of cocoa butter’s polymorphic nature. At a molecular level, cocoa butter can solidify into six different crystal forms, labeled I through VI. Only one, Form V (or Beta-V), provides the desirable qualities of a professional-grade chocolate: a glossy shine, a clean “snap” when broken, a smooth mouthfeel, and resistance to fat bloom. An in-depth analysis of crystal structures reveals that the first four forms yield a product that is soft, melts on contact, and appears dull. Form VI, while stable, can lead to the formation of white fat crystals on the surface.
The entire goal of tempering is to encourage the maximum formation of these stable Beta-V crystals. This structure is dense and tightly packed, which causes the chocolate to contract slightly as it cools—a critical property that allows it to release cleanly from polycarbonate molds. Scientifically, the stability of Beta-V crystals comes from their higher melting point. The coveted Beta-V crystals melt at a precise 34°C (93.2°F), which is just below human body temperature. This is why well-tempered chocolate melts pleasantly in your mouth, not in your hand.
Without proper tempering, the cocoa butter solidifies into a chaotic mix of unstable crystals. This leads to a crumbly texture, a dull appearance, and a susceptibility to “fat bloom,” where the unstable fats migrate to the surface, creating a greyish, unappetizing film. Therefore, mastering tempering isn’t just about aesthetics; it’s about dictating the final texture, stability, and shelf life of your product at a fundamental, structural level.
How Does Roasting Temperature Define the Final Chocolate Note?
The journey to a perfect temper begins long before the chocolate is melted; it starts with the roast. The roasting profile applied to the cacao bean is what unlocks its aromatic potential, developing the complex flavor notes through the Maillard reaction and other chemical transformations. A light roast on a high-acidity bean might preserve delicate fruity and floral notes, while a heavy, dark roast will develop deep, classic “chocolatey,” nutty, or caramel flavors. These flavors are carried by volatile aromatic compounds, which are extremely sensitive to heat.
The tempering method you choose can either preserve or destroy these delicate notes. Aggressive methods, like vigorous hand-tabling on a cold marble slab, are excellent for incorporating air and accelerating crystallization but can also cause some of the most delicate volatiles to dissipate. This is where the gentle, enclosed environment of the sous-vide method becomes a strategic advantage. By melting and holding the chocolate in a sealed bag, you create a closed system that minimizes the loss of these precious aromatic compounds, preserving the full integrity of the bean’s original flavor profile.
Therefore, the avant-garde chocolatier pairs the tempering method to the roast profile. For a light, acidic chocolate where preserving every floral nuance is paramount, a gentle sous-vide protocol is ideal. For a robust, dark-roasted chocolate, a more aggressive method might be acceptable or even desirable. The key is to keep the chocolate within the critical temperature window, between the melting point of type IV crystals (around 81°F/27°C) and safely below the melting point of the desired type V crystals (around 92.8°F/33.8°C), to avoid destroying the delicate flavor architecture you’re trying to showcase.
Why Overshooting by 1°C Destroys Your Beta Crystal Structure?
The concept of “perfect temper” hinges on the creation and preservation of a sufficient seedbed of Beta-V crystals. These crystals act as the blueprint, guiding the rest of the liquid cocoa butter to solidify into the same stable structure. The entire process of tempering—melting, cooling, and re-warming—is a carefully choreographed thermal dance designed to eliminate unstable crystals and promote Beta-V nucleation. However, this entire structure is incredibly fragile. The melting point of Beta-V crystals is approximately 34°C (93.2°F). Overshooting this temperature, even by a single degree, causes these crucial seed crystals to melt and dissolve back into the liquid mass.
When this happens, you have effectively reset the chocolate, losing your temper entirely. The liquid chocolate no longer has the necessary crystalline “seeds” to guide proper solidification. If used at this point, it will cool into a chaotic mix of unstable crystal forms, resulting in a dull, soft product. This is where the precision of sous-vide becomes its most powerful asset. While a double boiler or microwave can have temperature fluctuations of several degrees, modern immersion circulators offer incredible stability. Some professional tempering equipment boasts an accuracy up to 0.1°C, a level of control that is nearly impossible to achieve manually.
The industry recognizes that Beta-V crystal development occurs within a very specific temperature range. According to pastry experts, this critical nucleation zone is between 83°F (28.3°C) and 89°F (31.6°C). By using a sous-vide bath, you can hold the chocolate precisely within this zone for extended periods, allowing for optimal crystal formation without the risk of overshooting. This unmatched thermal control is what transforms tempering from a game of chance into a repeatable science.
The Knife Test: How to Read the Streaks in 3 Minutes?
The knife test is the classic, immediate diagnostic for assessing temper. However, for the precision-focused professional, it’s more than a simple pass/fail check; it’s a forensic analysis. The speed, finish, and patterns of the setting chocolate provide a wealth of data about your crystalline structure. To perform the test, dip the tip of a palette knife or a small piece of parchment into the chocolate and leave it at cool room temperature (around 68°F/20°C).
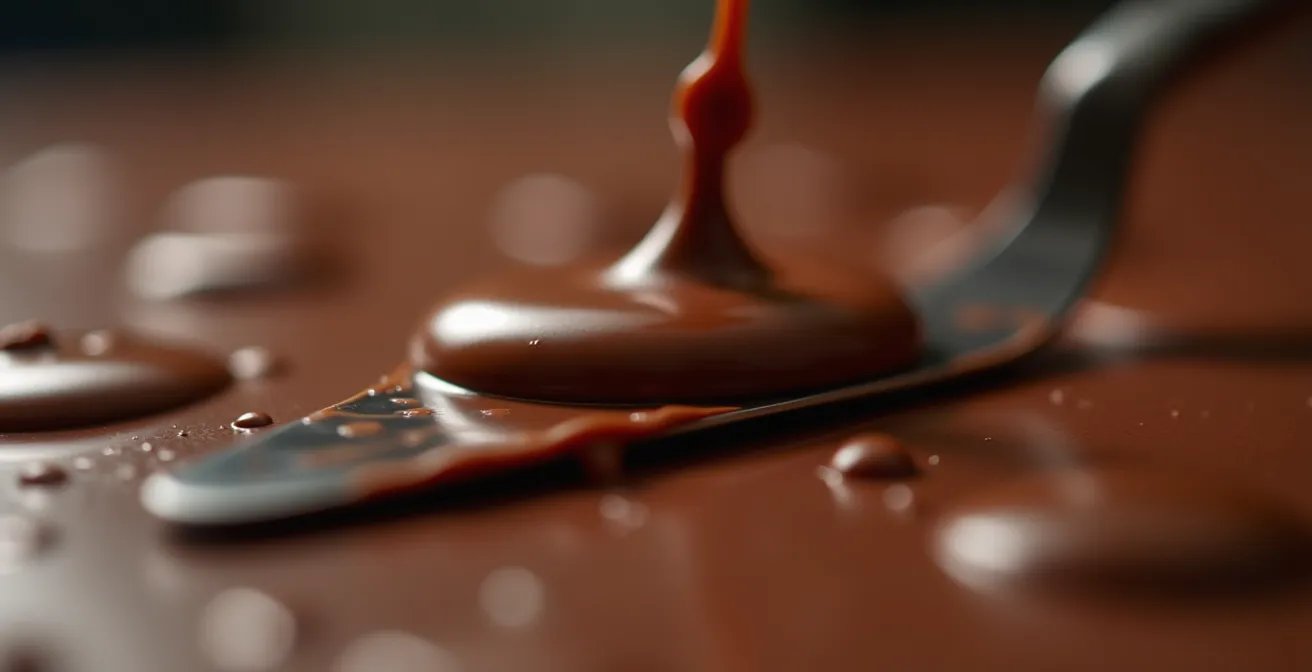
A perfectly tempered chocolate will set within 3 to 5 minutes, showing a uniform, deep gloss with no streaks. The surface should be smooth and even, indicating a dense, well-formed Beta-V crystal network. If the chocolate sets quickly but appears dull or matte, it’s likely under-crystallized; you have enough crystals to initiate setting, but not enough for a tight, reflective structure. Conversely, if it sets with streaky patterns or cloudy patches, it could indicate temperature shock or uneven crystal distribution. If the chocolate becomes thick and hard almost instantly and sets with a brittle, almost crumbly finish, you are dealing with over-crystallization, where the crystal growth has become too rapid and dense, compromising the flow properties (viscosity) of the chocolate.
Reading these signs allows for immediate intervention. Streaks? Your chocolate may need more gentle agitation to evenly distribute the crystals. A dull finish? It might require more time in the cooling phase or the addition of more “seed” chocolate. The knife test isn’t just a confirmation; it’s a dynamic feedback loop that informs your next move, allowing you to fine-tune your protocol in real time.
How to Achieve Mirror-Like Shine on Your Molded Bonbons?
The coveted mirror-like shine on a molded bonbon is the ultimate hallmark of a perfect temper. This gloss is not a superficial coating; it is the physical manifestation of a perfectly flat, dense, and stable Beta-V crystal structure flawlessly replicating the polished surface of the mold. Achieving it requires more than just well-tempered chocolate; it demands a holistic control of the environment and materials, specifically the mold itself.
A primary cause of dull spots or an imperfect shine is temperature shock. This occurs when warm tempered chocolate is poured into a mold that is significantly colder. The rapid cooling forces the cocoa butter to solidify into a chaotic mix of unstable crystals right at the contact surface, preventing the formation of a uniform Beta-V layer. To prevent this, professional chocolatiers meticulously manage the mold’s temperature, often by pre-warming polycarbonate molds to an ideal 26-27°C (79-81°F) before filling. This ensures the chocolate cools gradually, allowing the Beta-V crystals to form an unbroken, perfectly smooth surface against the mold wall.
The second critical factor is the cleanliness of the molds. Any microscopic residue, water spots, or fingerprints will disrupt the chocolate’s ability to make perfect contact with the surface, resulting in matte patches. Molds should be polished with a soft, lint-free cloth before use to ensure they are immaculate. The following table provides a quick troubleshooting guide for common shine defects.
| Defect | Visual Appearance | Primary Cause | Solution |
|---|---|---|---|
| Dull Spots | Matte patches | Dirty molds or temperature shock | Clean molds thoroughly; warm molds to 26-27°C. |
| Streaks | Linear marks | Poor temper or air bubbles | Ensure proper Beta V crystal seeding; tap molds to release air. |
| Footing | Excess at base | Overfilling or vibrations | Control fill level and allow to set on a stable surface. |
Wheel Machine vs. Hand Tempering: Is the Investment Justified?
For any growing operation, the question of scaling up tempering from manual methods to machinery is inevitable. The debate often centers on three primary methods: traditional hand tempering (tabling), automated wheel machines, and the precision-focused sous-vide method. Each occupies a distinct position in terms of cost, labor, and output, making the “best” choice entirely dependent on the scale and goals of the production.
Hand tempering is the artisan’s craft. With an initial cost of under $200 for scrapers and a marble slab, it is the most accessible method. However, it is incredibly labor-intensive, slow, and highly dependent on the skill of the operator and the ambient room conditions. It’s perfect for small-batch, artisanal work but impractical for any significant volume. At the other end of the spectrum, automated wheel tempering machines, with costs ranging from $5,000 to over $20,000, are built for large-scale production. They can temper large volumes of chocolate continuously, offering a significant increase in speed and reduction in labor costs. The market for this equipment is robust, and with the automatic chocolate tempering machine market expected to reach $620 million by 2030, it’s clear that automation is the future for high-volume producers.
The sous-vide method occupies a strategic middle ground. With an initial investment of just a few hundred dollars for an immersion circulator, it offers a level of precision and consistency that hand tempering cannot match, at a fraction of the cost of a wheel machine. It excels in small-to-medium batch production, research and development, or for holding smaller batches of tempered chocolate at a perfect working temperature for extended periods. The following table breaks down the return on investment for each method.
| Method | Initial Cost | Labor Reduction | Production Speed | Best For |
|---|---|---|---|---|
| Wheel Machine | $5,000-$20,000 | Up to 30% labor cost reduction | 50% speed increase | Large-scale production |
| Sous-Vide | $200-$500 | Moderate | Consistent holding | Small batches, R&D |
| Hand Tempering | $50-$200 | None | Slowest | Artisanal craft |
Key takeaways
- Tempering is a scientific process of cultivating stable Beta-V cocoa butter crystals for optimal snap, shine, and shelf life.
- The sous-vide method provides unparalleled thermal control, preventing the accidental destruction of these crucial crystals.
- Beyond temperature, achieving a mirror-like shine requires meticulous control over mold cleanliness and temperature to avoid shock.
How to rescue “Over-Tempered” Thick Chocolate with a Heat Gun?
One of the most common challenges in tempering is “over-tempering” or over-crystallization. This occurs when the chocolate is held in the working zone for too long or is agitated too much, causing the Beta-V crystals to grow excessively. The result is a rapid increase in viscosity, making the chocolate thick, sludgy, and nearly impossible to work with for delicate applications like molding or enrobing. While the common impulse is to discard the batch, a precise application of heat can rescue it.
The solution is not to simply reheat the whole batch, which would destroy the temper completely. Instead, you need to gently melt just enough of the excess crystals to restore fluidity without pushing the entire mass above the critical 34°C threshold. A heat gun is the perfect instrument for this surgical procedure. By applying short, controlled bursts of heat to the exterior of the bowl while folding the chocolate vigorously, you can introduce just enough thermal energy to dissolve some crystals and bring the viscosity back to a workable state. The key is to melt the excess crystals, not the entire seedbed.
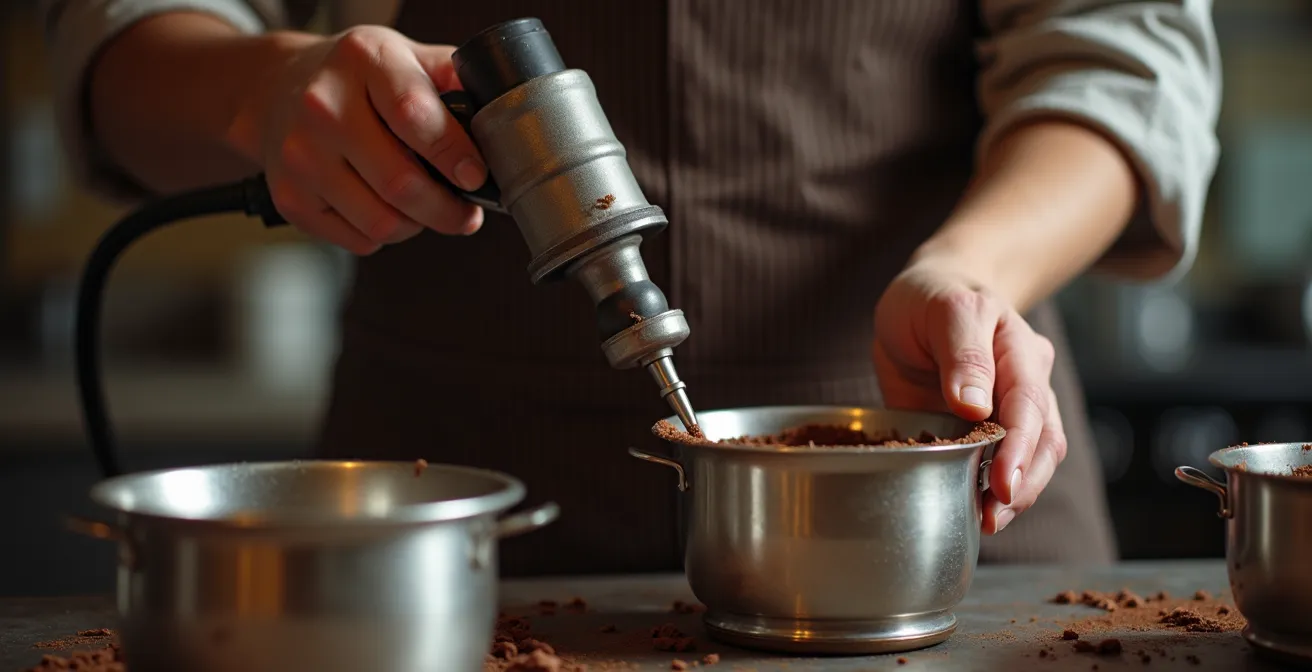
This technique requires precision and constant monitoring. You must diagnose if it is true over-crystallization first. Remember that beta crystals melt between 87°F and 91°F. If your chocolate is thick within this range, this method is appropriate. The goal is to keep the chocolate in a state of dynamic equilibrium, where crystal growth is balanced by a controlled melting process.
Action Plan: The Pulse-and-Fold Recovery Protocol
- Diagnose the Issue: Confirm the chocolate is thick but still within the correct working temperature range (e.g., 87-91°F / 30.5-32.8°C), indicating true over-crystallization.
- Apply Targeted Heat: Using a heat gun on a low setting, apply a 3-second burst of heat to the outside of the stainless steel bowl. Do not point the heat gun directly at the chocolate.
- Fold Vigorously: Immediately after the heat burst, use a spatula to fold the cooler, thicker chocolate from the edges and bottom into the warmer center.
- Monitor and Repeat: Check the viscosity. If still too thick, repeat the heat-and-fold process. Frequent, controlled additions of heat are better than one long blast.
- Verify Temperature: Constantly monitor the chocolate’s temperature with an instant-read thermometer to ensure it does not exceed the maximum working temperature for its type, thus destroying the temper.
How to Temper on a Hot Summer Day Without Air Conditioning?
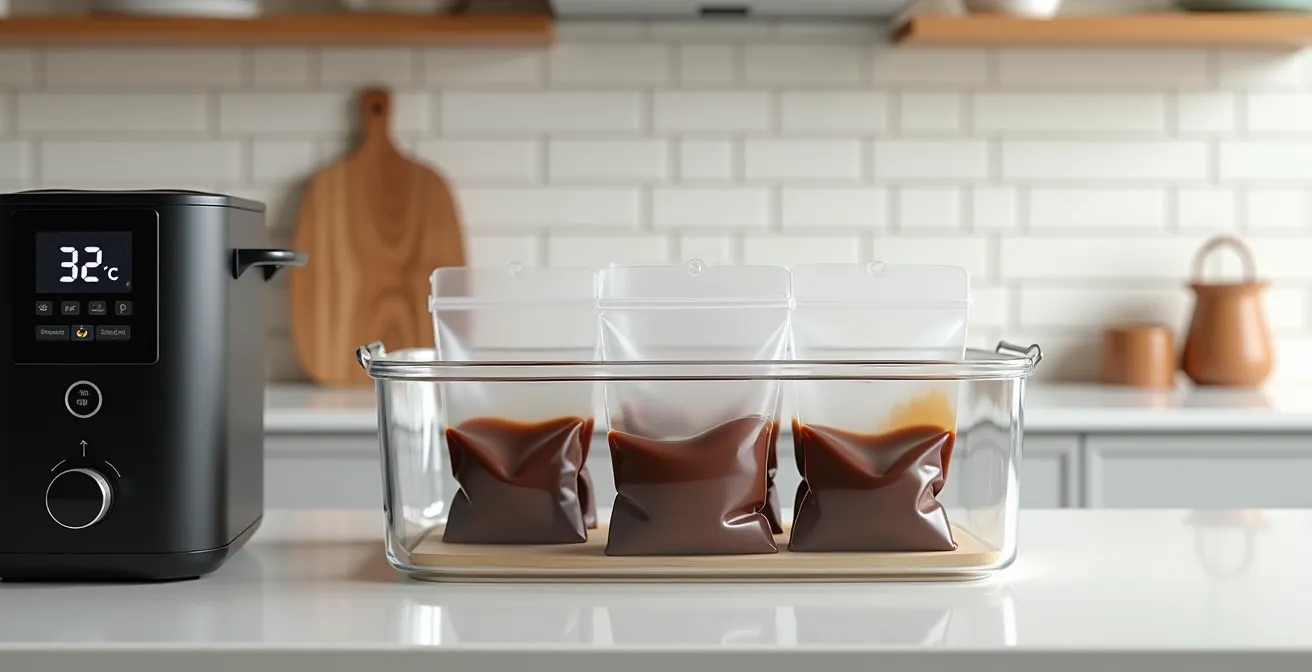
Tempering chocolate in a hot, humid environment is the ultimate stress test for any chocolatier. High ambient temperatures make it nearly impossible to cool the chocolate down to the crystallization zone, while humidity can cause sugar bloom and affect the final texture. This is a scenario where traditional methods often fail spectacularly, but where the enclosed, controlled ecosystem of the sous-vide method truly proves its superiority.
Many advocate for the sous-vide method’s simplicity, as noted in a review on Baked Bree, which states it’s a “fool-proof, mess-free, no waste method.”
You have complete control over the temperature and it’s really fool-proof. Tempering chocolate using the sous vide method is fool-proof.
– Bree, Baked Bree
While the term “fool-proof” is popular, the reality is more scientific. The method works not because it’s magic, but because the water bath acts as a massive thermal heatsink. It allows you to force the chocolate’s temperature down to the required 90°F (32°C) working temperature, even when the room is 95°F (35°C), by simply adding ice packs to the water bath. You are creating a controlled micro-climate. To execute this, melt the chocolate in the sous-vide at 115°F (46°C). Once melted, drop the circulator’s target to 90°F (32°C) and add ice to the water until it reaches that temperature. The water bath will now hold your chocolate precisely at the working temperature, insulated from the hostile ambient air.
To combat humidity, you must also create a controlled setting zone. This can be achieved by using a large styrofoam cooler containing frozen gel packs. Placing your filled molds inside this cooler creates a cool, dry environment that encourages a perfect set. Using desiccant packs inside the sealed container can further reduce humidity. By combining the thermal precision of the sous-vide with a controlled setting environment, you can produce flawless chocolate even in the most challenging conditions.
By moving past simple recipes and embracing a protocol-driven, scientific approach, you can transform the sous-vide from a simple tool into a powerful system for achieving total control over your chocolate work. Embrace this framework not as a set of rules, but as the foundation for your own innovation and mastery.