The core reason choux pastry turns soggy in a refrigerated display is uncontrolled water migration from the filling and the environment into the shell.
- Effective protection relies on building multiple hydrophobic (water-repelling) barriers, both internally and externally.
- The chemical stability of the filling, specifically its “water activity,” is as crucial as the dryness of the shell itself.
Recommendation: Shift your focus from simply “drying” the shell to a holistic strategy of moisture control at a molecular level, encompassing the dough, the baking process, internal coatings, and the filling’s composition.
For any pastry chef, the sight is a familiar tragedy: perfectly crisp, hollow choux shells, light as air, turning into damp, deflated disappointments within hours of being filled. The refrigerated display case, a necessity for preserving delicate creams, becomes the very environment that destroys the pastry’s signature texture. Common advice, like “fill just before serving,” is often a logistical nightmare in a commercial setting. The battle against sogginess seems constant and unwinnable, a frustrating cycle that undermines hours of precise work.
Many solutions focus on the obvious: baking the shells longer to dry them out. While essential, this is only a single piece of a much larger puzzle. The true enemy isn’t just moisture, but the relentless scientific principle of equilibrium. Water molecules will always migrate from an area of high concentration (the wet filling) to an area of low concentration (the dry shell). The key isn’t just to make the shell dry, but to fundamentally stop this migration in its tracks. What if the secret to lasting crispness wasn’t in a single technique, but in a multi-layered defense system built on food science principles?
This guide abandons simplistic tips and instead adopts the mindset of a baking chemist. We will deconstruct the choux pastry at a molecular level to understand precisely how and why it loses its integrity. We will explore how to build a series of hydrophobic barriers—from the dough itself to the final glaze—and, most critically, how to engineer a filling with low water activity. By controlling moisture at every stage, you can extend the crisp, perfect life of your éclairs and cream puffs from a mere two hours to well over a day, even under the challenging conditions of refrigeration.
To master this complex interplay of texture and moisture, this article breaks down the essential scientific interventions. We will explore each critical stage, from creating the initial protective layer to engineering the final glaze, providing a complete roadmap to achieving lasting crispness in your choux pastry.
Summary: A Scientific Approach to Crisp Choux Pastry
- Why Does a Layer of Dough Help Choux Rise More Evenly?
- The Baking Mistake That Leaves Moisture Inside the Shell
- Cocoa Butter Spray: Is It Necessary for Daily Production?
- How to Refresh Day-Old Choux Shells Before Filling?
- Salt and Cocoa: How to Flavor the Shell Itself?
- How to Glaze Éclairs perfectly Without Fingerprints or Drips?
- Which Cocoa Powder Type Creates the Darkest, Moistest Cakes?
- The Filling Mistake That Makes Choux Pastry Soggy in 2 Hours
Why Does a Layer of Dough Help Choux Rise More Evenly?
The thin, crisp wafer of craquelin placed atop a choux bun before baking is often seen as a decorative element, adding texture and sweetness. However, its primary function is far more scientific: it acts as a thermal insulator and a structural guide. As the choux enters the hot oven, the craquelin, which is high in fat and sugar, melts and spreads into a uniform layer. This layer serves two critical purposes. First, it forces the steam-driven expansion of the choux to occur more evenly, preventing the shell from cracking or developing weak spots. Instead of bursting from a single point, the entire mound of dough rises uniformly underneath this weighted blanket.
Second, this layer creates an initial hydrophobic barrier. The fat from the butter in the craquelin creates a water-repelling surface that offers the first line of defense against ambient humidity once the choux has cooled. This technique is a cornerstone of professional production, not just for aesthetics but for structural integrity. The choice of flour in the choux itself also plays a role. Using a strong bread flour with a higher protein content contributes to a more robust shell that can withstand the powerful rise and maintain its shape.
Professional Baking Techniques for Crack-Free Eclairs
In a series of tests, professional baker Matt Adlard found that combining a strong bread flour dough with perforated eclair mats for even airflow was key. His method involves coating the piped dough with a light cooking oil spray and a dusting of icing sugar before baking. This combination creates a formidable protective barrier, resulting in flawlessly smooth, crispy shells that are significantly more resistant to moisture after being filled.
To achieve a perfect craquelin layer, precision is key. The dough must be rolled to a consistent thickness (typically 2mm) and frozen solid before being cut and placed on the choux. This ensures it doesn’t melt prematurely and maintains its structural influence during the critical first few minutes of baking. This small step transforms the choux from a potentially unpredictable pastry into a consistently perfect, structurally sound, and more durable product.
The Baking Mistake That Leaves Moisture Inside the Shell
The most common failure in achieving a truly crisp choux shell is incomplete drying during the baking phase. A choux that looks perfectly golden-brown on the outside can still harbor a significant amount of internal moisture, which will quickly turn the shell soft from the inside out. The baking process is not just about cooking the dough; it’s a carefully controlled dehydration process. The initial high-temperature blast is what causes the water in the dough to turn to steam and rapidly inflate the shell. However, once the structure is set, the goal shifts to driving out that very same steam.
A single, consistent baking temperature is inefficient. Professionals employ a two-stage baking strategy to maximize both lift and dryness. This method starts with a high initial temperature to achieve maximum puff, followed by a lower temperature for an extended period to thoroughly dry the interior walls of the shell. A recent analysis confirms the efficacy of this method, showing that a two-stage bake is paramount for moisture reduction. Without this drying phase, the trapped steam condenses as the choux cools, leaving the interior walls damp and leading to rapid collapse and sogginess.
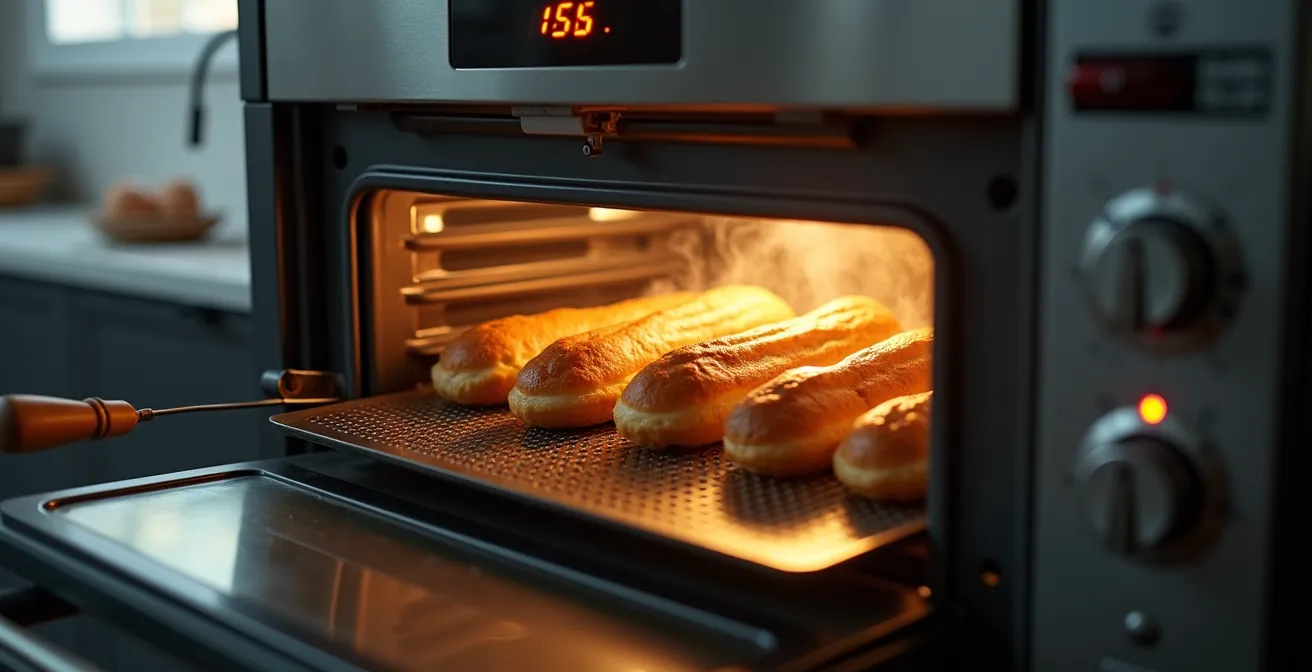
As the illustration above demonstrates, a crucial final step is to physically release any remaining trapped steam. After the structure is fully baked and stable, piercing the shells or leaving the oven door slightly ajar for the last few minutes of baking allows the final vestiges of moisture to escape. This single action can be the difference between a shell that stays crisp for days and one that goes soft in hours.
Your Action Plan: Professional Steam Release Protocol
- Bake at 400°F (200°C) for the initial 25 minutes without opening the oven door to ensure maximum inflation.
- Quickly pierce each shell with a sharp knife in the center or on the lower side to create a vent.
- Return the shells to the oven with the door cracked open for an additional 10 minutes to allow all steam to escape.
- Cool the shells completely on their baking trays; moving them to a wire rack too soon can cause them to soften.
- For extra insurance against humidity, reheat the empty shells at 300°F (150°C) for 5-8 minutes just before filling.
Cocoa Butter Spray: Is It Necessary for Daily Production?
Once you have a perfectly baked, dry shell, the next line of defense is an internal moisture barrier. This is where the concept of a hydrophobic coating becomes a game-changer for commercial production. The goal is to line the inside of the choux shell with a fat-based, water-repelling layer that physically prevents moisture from the filling from seeping into the pastry walls. Cocoa butter is the ideal candidate for this role due to its neutral flavor and exceptional barrier properties.
The question for a professional kitchen is whether a specialized product like aerosolized cocoa butter spray is a necessity or a luxury. While incredibly convenient, it is also the most expensive option. The decision often comes down to a trade-off between cost, labor, and effectiveness. A thin layer of melted and brushed-on cocoa butter provides nearly identical protection at a lower cost, though it requires more time and care in application. Tempered white chocolate can also serve as a barrier, but its sweetness can alter the flavor profile of the final product and its barrier is less effective.
The non-polar fat molecules in cocoa butter create a hydrophobic layer that actively repels the polar water molecules from cream fillings, extending shell crispness from 2 hours to over 24 hours.
– Professional Pastry Chef Institute, Advanced Techniques in French Pastry
For a high-volume operation, the speed and consistency of a cocoa butter spray can justify the cost by saving significant labor and guaranteeing a uniform coating. For smaller productions or applications where a slight chocolate note is acceptable, using melted cocoa butter or even a thin layer of pure melted dark chocolate can be a highly effective and more economical strategy. The following table breaks down the pros and cons of each method.
| Method | Barrier Effectiveness | Cost | Application Ease | Flavor Impact |
|---|---|---|---|---|
| Cocoa Butter Spray | Excellent (95%) | High ($25/can) | Very Easy | Neutral |
| Melted Cocoa Butter | Excellent (93%) | Medium ($15/lb) | Moderate | Slight chocolate note |
| Tempered White Chocolate | Good (85%) | Low ($8/lb) | Difficult | Sweet, milky |
| No Barrier | Poor (0%) | None | N/A | None |
How to Refresh Day-Old Choux Shells Before Filling?
Despite best efforts, humidity can sometimes creep into even the best-stored choux shells, leaving them slightly soft and lacking their characteristic snap. This is especially true for shells made a day or two in advance. Fortunately, the process is reversible. Because the shell’s structure is primarily dried starch, it can be re-crisped by gently reheating it to drive off any absorbed moisture. This process is known as starch retrogradation reversal.
The key is to use a moderate temperature. An oven that is too hot will brown the shells further or even burn them, while an oven that is too cool won’t be effective at evaporating the moisture. The ideal temperature is around 300°F (150°C). At this heat, the absorbed water molecules are driven off without altering the color or flavor of the shell. This simple “refreshing” protocol can restore day-old or even frozen shells to a state that is nearly indistinguishable from freshly baked.
Commercial testing confirms the remarkable effectiveness of this method. In a controlled study, it was found that properly stored shells could be revived with exceptional results, making batch production far more viable.
Commercial Bakery Storage and Refreshing Success
Land O’Lakes commercial testing found that choux shells stored in airtight containers at room temperature for up to two days maintained 90% of their original crispness when refreshed using the 300°F protocol. Even more impressively, shells that were frozen for up to three months in zip-lock bags successfully re-crisped to 85% of their fresh-baked texture after being thawed at room temperature and then heated for 10 minutes at a moderate temperature.
This technique is a vital tool for any professional pastry operation, allowing for greater flexibility in production schedules. By baking shells in large batches and refreshing them as needed, you can manage inventory efficiently without sacrificing the quality of the final product. It’s a simple, scientific solution to a common logistical problem.
Salt and Cocoa: How to Flavor the Shell Itself?
Flavoring the choux pastry shell is not just about taste; certain ingredients can fundamentally alter and improve its structure and longevity. Salt, while a flavor enhancer, also plays a role in strengthening the gluten network in the flour, contributing to a more robust shell. However, the most impactful structural ingredient you can add is cocoa powder. Beyond lending a deep chocolate flavor, cocoa powder significantly changes the shell’s chemistry.
Specifically, Dutch-process cocoa powder has a profound effect. This type of cocoa has been treated with an alkali to neutralize its acidity, which not only darkens its color but also changes how it interacts with other ingredients. The alkalinity of Dutch-process cocoa helps to strengthen the protein structure of the dough. Food science research demonstrates that Dutch-process cocoa at 10% of the flour weight increases shell stability by 25%. This results in a shell that is not only darker and more flavorful but also physically sturdier and more resistant to becoming soggy.
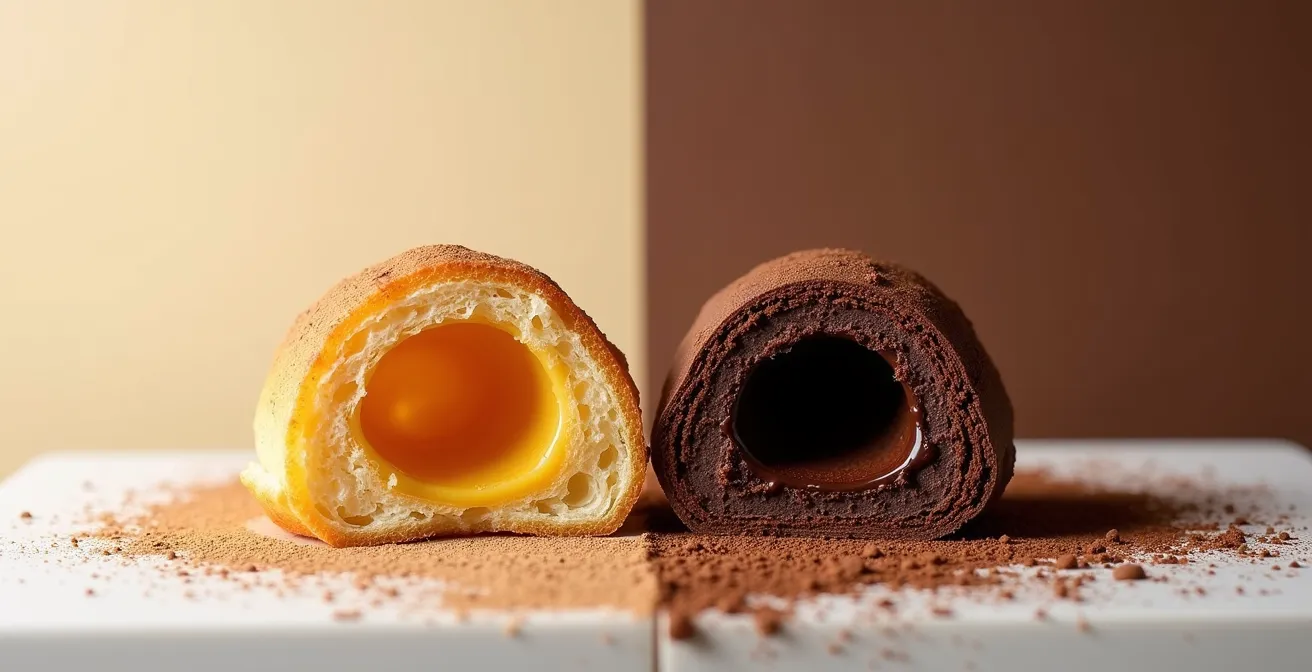
The image above illustrates the visible difference in structure. The cocoa-infused shell on the right often exhibits a finer, more even crumb and a sturdier wall structure compared to the plain shell on the left. This is because the cocoa particles integrate into the starch-protein matrix, creating a more complex and resilient network. By substituting a portion of the flour with Dutch-process cocoa, you are effectively engineering a stronger, more moisture-resistant pastry from the very first step.
This is a powerful example of how a flavor ingredient can double as a functional, structural enhancer. When choosing to make chocolate éclairs or profiteroles, incorporating cocoa directly into the pâte à choux is a strategic decision that pays dividends in both taste and texture, contributing directly to the end goal of a longer-lasting crisp shell.
How to Glaze Éclairs perfectly Without Fingerprints or Drips?
The final glaze on an éclair serves as the third and final line of defense against moisture. A properly applied, fat-based glaze like a chocolate ganache creates a hermetic seal that locks out ambient humidity from the refrigerated display case. However, achieving a flawless, drip-free finish that also functions as a perfect barrier requires control over temperature and technique.
The most common mistake is using a glaze that is either too hot or too cold. A glaze that’s too hot will be too thin, running down the sides and failing to create a solid seal. It can even melt the delicate choux structure. A glaze that’s too cold will be thick and clumpy, impossible to apply smoothly and leaving an unprofessional finish. As one study shows, there is a very specific temperature window for optimal results. Pastry chef Zoë François documented that ganache held between 88-92°F (31-33°C) provides the perfect viscosity for dipping. This temperature is warm enough for the ganache to flow smoothly but cool enough to set quickly upon contact with a chilled éclair.
The dipping technique itself is also crucial for creating that perfect seal. The “dip-and-drag” method is standard among professionals. The top of the chilled éclair is dipped fully into the temperature-controlled ganache, ensuring complete coverage. As it is lifted out, the top edge of the éclair is gently dragged along the rim of the bowl. This motion cleanly removes all excess ganache, preventing drips while leaving a perfectly even, sealed surface. Using this method eliminates the need to touch the glaze, thus avoiding fingerprints and smudges.
| Glaze Type | Moisture Barrier | Hold Time | Application Temp |
|---|---|---|---|
| Chocolate Ganache | Excellent (95%) | 8+ hours | 88-92°F |
| Pure Melted Chocolate | Excellent (93%) | 12+ hours | 86-88°F |
| Fondant Icing | Poor (40%) | 1-2 hours | 95-100°F |
| Water-based Glaze | Very Poor (20%) | <1 hour | Room temp |
As the data shows, not all glazes are created equal. Sugar-and-water-based icings, like fondant, are hygroscopic (they attract water) and offer very poor protection. A fat-based glaze is non-negotiable for creating a pastry that can withstand refrigeration.
Which Cocoa Powder Type Creates the Darkest, Moistest Cakes?
While the title of this section refers to cakes, the underlying scientific principle is directly applicable and absolutely critical to creating stable fillings for choux pastry. The term “moist” in a professional context does not mean “wet”; it means a stable emulsion where moisture is locked in and does not leach out. The single biggest threat to a crisp choux shell is a filling with high “free water,” and the choice of cocoa powder is a powerful tool for controlling this. This is the science of water activity (aw).
Natural cocoa powder is acidic and does little to bind water. Dutch-process cocoa, being alkaline, is a better choice. It interacts more effectively with starches and proteins in a pastry cream, helping to create a more stable gel. Professional pastry testing shows that Dutch-process cocoa reduces water activity in pastry cream by 18% compared to its natural counterpart. This is a significant reduction in the amount of “free water” available to migrate into the choux shell.
To take this principle to its extreme, we look at “black” cocoa powder. This is an ultra-alkalized cocoa that provides an intensely dark color and a unique flavor profile. More importantly, its chemical structure makes it exceptionally effective at binding water in a cooked filling.
Black cocoa’s ultra-alkalized nature creates a very stable molecular structure when combined with starches and dairy, resulting in a filling with extremely low water activity that prevents shell softening for 48+ hours.
– Chef Iso, Master Techniques in Pastry Science
Therefore, when formulating a chocolate pastry cream or mousse intended for choux pastry, choosing a highly alkalized (Dutch-process or black) cocoa is not just a flavor decision; it is a primary strategy for ensuring the longevity of your finished product. By reducing the water activity of the filling itself, you are fighting the battle against sogginess from the inside, making every external barrier you’ve built even more effective.
Key Takeaways
- Lasting crispness is a system: it requires a dry shell structure, hydrophobic barriers, and a low-moisture filling.
- Bake in two stages (high then low heat) and vent the shells to drive out all internal steam for maximum structural integrity.
- Use fat-based barriers like cocoa butter (internally) and ganache (externally) to physically block moisture migration.
- Control the filling’s “water activity” by using alkalized cocoa powders and stabilizers like gelatin to lock in moisture.
The Filling Mistake That Makes Choux Pastry Soggy in 2 Hours
The final and most critical piece of the puzzle is the filling itself. You can have the most perfectly baked, triple-coated choux shell in the world, but if you fill it with an unstable, “weeping” pastry cream, it will be soggy in hours. The ultimate mistake is failing to control the water activity of the filling. This is a measure of “free” water molecules that are not chemically bound to other ingredients like starches, sugars, or fats. It is this free water that relentlessly attacks the choux shell from the inside.
Properly cooking a pastry cream is the first step. The mixture must be brought to a full rolling boil for at least 60 seconds. This ensures the starches achieve full gelatinization, meaning they swell and burst, creating a thick molecular mesh that traps a large amount of water. Under-cooking the cream leaves starches only partially activated and results in a weak structure that will release water over time. Another key technique is emulsifying fat (like butter or chocolate) into the hot cream, which further encapsulates water molecules.
However, for maximum insurance, especially for pastries that need to hold for over a day, professionals turn to hydrocolloids. Gelatin is the most common and effective tool in this fight. It creates a powerful, secondary molecular network that traps any remaining free water the starches might have missed. A small amount can dramatically increase the stability and hold-time of a filled pastry.
The Gelatin Insurance Policy Success Story
The commercial bakery Pastries Like a Pro transformed their choux production by adding gelatin to their pastry cream. Internal testing revealed that just one teaspoon of gelatin per cup of liquid effectively binds free water molecules. This allowed their filled and refrigerated éclairs to maintain their crispness for over 24 hours. As detailed in their process, this technique enabled them to wholesale frozen filled pastries that thaw with a perfect texture, completely eliminating the two-hour soggy shell problem that had plagued their business.
By applying this holistic, scientific approach—building a structurally sound shell, creating multiple hydrophobic barriers, and engineering a stable, low-water-activity filling—you can finally win the war against moisture. Your choux pastries will not only taste exceptional but will also maintain their signature crisp texture long after they are placed in the display case.