
A successful chocolate tasting under $100 is less about budget and more about crafting a memorable sensory journey for your guests.
- Theme is key: Choose between a “percentage” or “single-origin” focus to make comparisons meaningful and engaging.
- Order matters: Always serve chocolates from the lowest to the highest cacao percentage to avoid “palate burnout.”
Recommendation: Prioritize creating a professional tasting setup and a clear “palate journey” over buying expensive, decorative items to maximize the experience-per-dollar.
Planning a get-together that feels fresh, engaging, and sophisticated can be a challenge. You want to move beyond the standard wine and cheese night, creating a memorable experience for your friends, but the thought of hosting something complex or expensive is daunting. Many people think a chocolate tasting requires a huge budget for rare bars and a professional’s knowledge. They grab a few random chocolates, some crackers, and hope for the best, often missing the magic of the experience.
But what if the secret to an unforgettable and affordable tasting event isn’t in the price of the chocolate, but in the design of the experience itself? The key lies in mastering the sensory architecture of your party. This is about consciously structuring every element, from the setup to the sequence of tasting, to guide your guests on a journey of genuine discovery. It’s about transforming a simple activity into a fascinating exploration of taste, texture, and aroma, making everyone feel like an expert.
This guide will walk you through building that very experience. We’ll show you how to design a professional-level tasting at home, choose an engaging theme that fits your budget, and curate a sequence of chocolates that tells a story—all while ensuring every single guest, regardless of dietary needs, feels included and delighted. Get ready to host an event they’ll talk about for weeks.
To help you navigate this delicious journey, we’ve broken down the process into clear, manageable steps. This structure is designed to build your confidence as a host, ensuring you cover every detail from the philosophical to the practical for a flawless event.
Summary: A Complete Guide to Your First Blind Chocolate Tasting Party
- Why Sharing Chocolate Breaks the Ice Faster Than Wine?
- How to Set Up a Professional Tasting Mat at Home?
- Single Origin vs. Percentage: Which Theme Engages Guests More?
- The Hosting Nightmare: Serving Milk Chocolate to Vegans Unknowingly
- When to Serve the Strongest Chocolate to Avoid Palate Burnout?
- How to Identify the 3 Primary Aromatic Families in Fine Chocolate?
- How to Curate a Chocolate Box That Pleases Every Generation?
- How to Curate a Chocolate Box That Pleases Every Generation?
Why Sharing Chocolate Breaks the Ice Faster Than Wine?
The magic of a blind chocolate tasting lies in its unique ability to level the playing field and spark genuine connection. Unlike wine, where guests might feel intimidated by complex terminology or preconceived notions of “good” and “bad” vintages, chocolate offers a more universally accessible and playful medium for sensory exploration. The simple act of tasting blind removes the influence of branding, packaging, and price, inviting everyone to trust their own palate. This shared vulnerability becomes a powerful social catalyst.
When you remove bias, you create an environment of pure discovery. Guests are no longer performing for each other; they are on a personal journey, which they then share. A fascinating study on blind tasting in Harvard Square confirmed this phenomenon, revealing that without labels, participants could evaluate chocolate purely on its merits, leading to more authentic reactions and surprising preferences. This process of preconception removal encourages conversation as guests compare notes, laugh at their surprising likes or dislikes, and bond over the shared experience of discovery.
To facilitate this, creating the right atmosphere is key. You don’t need a formal setting, just a comfortable space where guests can focus. Here are a few simple tips to set the stage for a welcoming tasting environment:
- Select a comfortable area with ample, neutral lighting to help guests see the subtle color differences in the chocolate samples.
- Ensure the room is free from competing smells like scented candles or cooking aromas that could interfere with aroma detection.
- Provide room-temperature water and neutral snacks like plain crackers for essential palate cleansing between samples.
- Give each guest a simple sheet to jot down their impressions. This isn’t a test, but a tool to help them track flavors and remember their favorites for the final reveal.
Ultimately, a blind chocolate tasting works so well because it transforms a passive activity into an interactive game. It’s a shared quest to uncover hidden flavors, making it a far more dynamic and memorable icebreaker than simply pouring another glass of wine.
How to Set Up a Professional Tasting Mat at Home?
To elevate your party from a casual snack session to a structured sensory event, the tasting mat is your most important tool. It acts as a map for your guests’ palate journey, providing a designated space for each sample and encouraging a methodical approach to tasting. You don’t need to buy expensive pre-printed mats; creating your own is easy, affordable, and adds a personal touch that your guests will appreciate.
The goal of the mat is to guide the taster through the four key stages of evaluation: visual, aroma, taste, and texture. A simple hand-drawn layout on a sheet of white paper is perfectly effective. It provides a clean, organized canvas for the experience.

As you can see, the focus is on simplicity and function. This structured approach, inspired by professional tasting series that explore sensual perception without regard to price or origin, empowers your guests to form their own opinions. By giving them a framework, you turn them from passive consumers into active analysts. The following table breaks down how to structure your DIY mat for a professional feel.
| Mat Section | Purpose | Professional Tip |
|---|---|---|
| Sample Circles | Space for unwrapped chocolate pieces | Number each circle 1-6 to track the tasting order. |
| Aroma Notes | For recording initial smell impressions | Encourage guests to smell the chocolate before tasting. |
| Tasting Notes | For tracking how the flavor develops | This is where you’ll note primary flavors and aftertaste. |
| Texture/Sound | For assessing the quality of the ‘snap’ | Note if the chocolate snaps sharply or bends softly. |
This small effort transforms the table into a laboratory of flavor, signaling to your guests that they are in for a special, thoughtfully planned event. It’s a cornerstone of building your event’s sensory architecture.
Single Origin vs. Percentage: Which Theme Engages Guests More?
One of the most critical decisions in designing your sensory architecture is choosing a theme. A theme provides a narrative for your tasting, turning a random selection of chocolates into a coherent and educational story. As event host Chrystina Noel advises, “When tasting, you should choose a ‘theme’ so that the things you are tasting have as few variables as possible when telling the difference between them.” This focus is what allows for meaningful comparison and deeper engagement.
The two most popular and effective themes for a blind tasting are Percentage (Cacao Content) and Single Origin.
- Percentage Theme: This involves tasting a series of dark chocolates with increasing cacao percentages (e.g., 65%, 72%, 80%, 88%). This theme is excellent for beginners as it clearly demonstrates how a single variable—the amount of sugar—dramatically affects flavor, moving from sweeter notes to more intense, bitter, and complex profiles. It’s a linear journey that’s easy to follow.
- Single Origin Theme: Here, you select several chocolates with the same cacao percentage but made with beans from different countries (e.g., all 70% bars, from Madagascar, Peru, and Ecuador). This theme is slightly more advanced but incredibly rewarding. It showcases the concept of *terroir* in chocolate, where the soil and climate of a region impart unique flavors. For instance, cacao from Madagascar often has bright, fruity notes, while cacao from Peru can be more floral.
So, which is better? For a first-time host aiming to create an engaging experience for a mixed crowd, the Percentage theme is often the safer, more impactful choice. The progression is clear and the differences are immediately noticeable. However, if your guests are foodies, a Single Origin theme can spark fascinating conversations. Regardless of your choice, theming is key to staying on budget. By focusing your purchases, you can create a high-impact event, as experienced hosts report that a successful tasting costs just $12-15 per person for a group of 8-12, which fits perfectly within our $100 goal.
Ultimately, a strong theme prevents the tasting from feeling arbitrary. It gives your guests a puzzle to solve and a clear story to follow, dramatically increasing their engagement and the overall “experience-per-dollar” of your event.
The Hosting Nightmare: Serving Milk Chocolate to Vegans Unknowingly
A truly successful event is an inclusive one. The most carefully planned sensory architecture can collapse in an instant if a guest discovers they can’t participate due to a dietary restriction. The “vegan nightmare”—accidentally serving chocolate containing dairy to a vegan guest—is more than just an awkward moment; it can undermine the trust and comfort you’ve worked to build. As a thoughtful host, anticipating and managing dietary needs is non-negotiable.
While many dark chocolates are naturally vegan (containing only cacao, sugar, and cocoa butter), hidden dairy ingredients like whey, casein, or milk fat can sometimes be present. Furthermore, cross-contamination can be a concern for those with severe allergies. The solution isn’t to limit your selection, but to implement a clear and discreet system that ensures safety without making anyone feel singled out. A simple color-coded system for plates is an elegant and effective method.
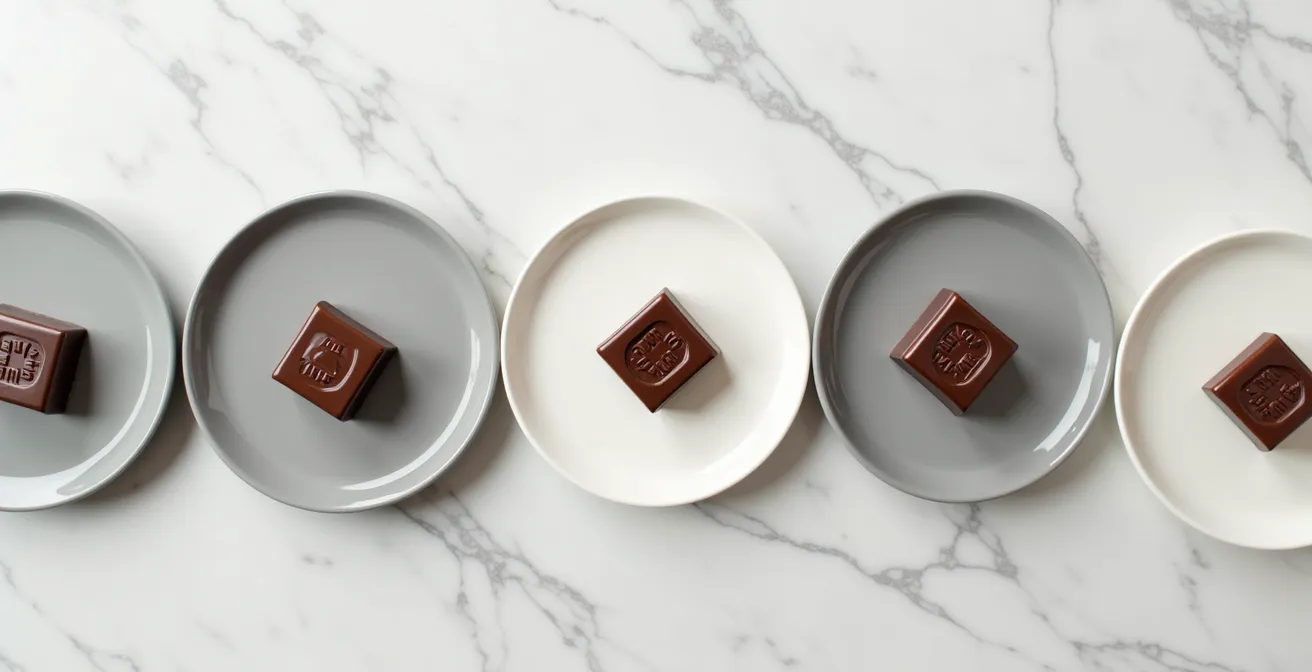
This visual cue allows guests to self-select safely and confidently. It shows a level of care that speaks volumes. To implement this flawlessly, you need a clear plan of action from the moment you start shopping until the last piece of chocolate is served.
Your Vegan-Safe Chocolate Action Plan
- Ingredient Scrutiny: When buying, meticulously check labels for hidden dairy like whey, casein, milk solids, milk fat, and lactose.
- Establish a Baseline: Start your selection with one or two bars that are explicitly labeled “vegan” to create a guaranteed safe foundation for your tasting.
- Visual Coding System: Use different colored plates or markers on your tasting mat (e.g., a green dot for vegan-safe) to clearly and discreetly identify options.
- Cross-Contamination Prevention: Use separate knives and cutting boards for vegan and non-vegan chocolates to respect guests with severe allergies or strict preferences.
- Keep Packaging Accessible: Have the original wrappers nearby, so guests who are extra cautious can double-check the ingredients for themselves.
By taking these simple precautions, you demonstrate the highest level of hospitality. You’re not just serving chocolate; you’re creating a safe, welcoming, and truly enjoyable space for every single one of your friends.
When to Serve the Strongest Chocolate to Avoid Palate Burnout?
The order in which you serve your chocolates is the single most important element of your tasting’s sensory architecture. Get it wrong, and you risk “palate burnout”—overwhelming your guests’ taste buds early on, rendering them unable to appreciate the subtle notes in later samples. Get it right, and you create a beautiful, escalating journey of flavor. The cardinal rule is simple and absolute: always progress from low to high cacao percentage, or from milder to more intense flavors.
Think of it like a musical performance. You wouldn’t start with the loud, crashing finale. You begin with quieter melodies to tune the ear before building to a crescendo. Similarly, starting with a 55% or 60% cacao chocolate allows the palate to warm up. If you begin with an intense 85% bar, its powerful bitter notes and tannins will linger, masking the delicate fruity or floral aromas of any milder chocolates that follow. Professional tasters follow this principle religiously, often conducting tests in a randomized but controlled order to ensure each product is evaluated on a relatively “clean” palate.
To manage this journey effectively, palate cleansing is crucial. This isn’t just about drinking water; it’s about resetting the senses. Simple, unsalted crackers or a small piece of plain bread are effective. It’s also vital to use room temperature water, as cold water can numb the tongue and cause the cocoa butter in the chocolate to harden in the mouth, muting its flavor release. Before the event, you should also advise guests to avoid strong flavors like garlic, coffee, or mint, as these can linger and interfere with their ability to taste accurately.
By carefully curating this “palate journey,” you guide your guests through a story told in flavor. This deliberate progression is what separates a thoughtful tasting from a simple free-for-all, ensuring every chocolate in your lineup gets a chance to truly shine.
How to Identify the 3 Primary Aromatic Families in Fine Chocolate?
The true “wow” moment in a chocolate tasting comes when a guest tastes a piece and exclaims, “I’m getting notes of cherry!” or “This one smells like nuts and coffee!” This is the point of aromatic unveiling, where you guide your friends beyond the simple taste of “chocolate” and into the complex world of its secondary flavors. Most fine chocolate aromas can be grouped into three primary families: Fruity/Floral, Nutty/Spicy, and Earthy/Woody. Your role as host is to give guests the tools and confidence to identify them.
You don’t need to be a professional to lead this. The key is to encourage observation and assure guests there are no wrong answers. Flavor perception is deeply personal. You can set up “sensory training” by simply providing examples. Mention that they might find flavors of fruit (like raspberry or citrus), flowers (like jasmine), spices (like cinnamon), or even smoke and leather. These suggestions act as signposts, giving them a vocabulary to articulate what they’re experiencing.
To make this process less intimidating, break it down into a simple, guided ritual for each chocolate. This methodical approach helps focus the senses and unlocks flavors that are easily missed. Here is a step-by-step process you can walk your guests through:
- Look and Listen: Observe the color and sheen. Is it deep brown or reddish? Then, break a piece near your ear. A high-quality dark chocolate should have a clean, sharp “snap.”
- Smell: Before tasting, bring the chocolate to your nose and take a deep breath. What are the first scents you notice? Is it fruity, earthy, or roasty?
- Melt: Place the piece in your mouth but don’t chew it immediately. Let it melt on your tongue. The initial flavors will be released as the cocoa butter melts.
- Breathe and Analyze: As the chocolate melts, breathe gently through your nose. This is called retro-nasal olfaction, and it’s where most of the complex aromas are detected. Rub your tongue against the roof of your mouth to slightly increase the temperature and release the final, lingering flavors.
- Discuss: After everyone has finished, open the floor for comments. Ask what they noticed, what they liked, and what surprised them. This sharing is where the real fun happens.
By teaching this simple ritual, you give your friends a new skill and a deeper appreciation for chocolate. You’re not just hosting a party; you’re opening a door to a new world of flavor they can explore long after the evening is over.
Key Takeaways
- A focused theme (Percentage or Single Origin) is essential for a meaningful and budget-friendly tasting.
- The tasting order is crucial: always progress from lower to higher cacao content to avoid palate burnout.
- Guiding guests to identify aromatic families (Fruity, Nutty, Earthy) is what elevates the experience from simple tasting to genuine discovery.
How to Curate a Chocolate Box That Pleases Every Generation?
Now that you understand the principles of theming and tasting order, you can focus on the art of selection. Curating the perfect box of chocolates for a diverse group is like casting a play: each character must have a distinct role, but they must also work together to tell a cohesive story. Your goal is to build a lineup that offers comfort, challenges the palate, and ultimately pleases everyone from the chocolate novice to the seasoned enthusiast.
The foundation of a multi-generational selection lies in understanding broad taste preferences. While your theme provides the structure, the specific bars you choose provide the personality. Globally, milk chocolate remains the most popular type, beloved for its sweet, creamy, and familiar flavor. It’s your “crowd-pleaser.” Conversely, dark chocolate offers a wider spectrum, from semi-sweet to intensely bitter, appealing to those with a more adventurous or mature palate. A well-rounded box needs to bridge this gap.
When curating your selection of 5-6 chocolates within your chosen theme, think in terms of these archetypes:
- The Welcome Hug: A lower percentage dark chocolate (55-65%) or a high-quality milk chocolate. It’s familiar, comforting, and an easy entry point.
- The Intriguing Stranger: This is where your theme shines. If you’re doing a percentage theme, this is your mid-range (70-75%) bar. If single-origin, this is one with a distinct flavor profile, like a fruity Madagascar bar.
- The Bold Protagonist: Your highest percentage chocolate (80-88%). This is the climax of your tasting journey—intense, complex, and memorable.
- The Wild Card: An optional but fun addition. This could be a chocolate with an inclusion like nibs, salt, or a subtle spice that relates to your theme.
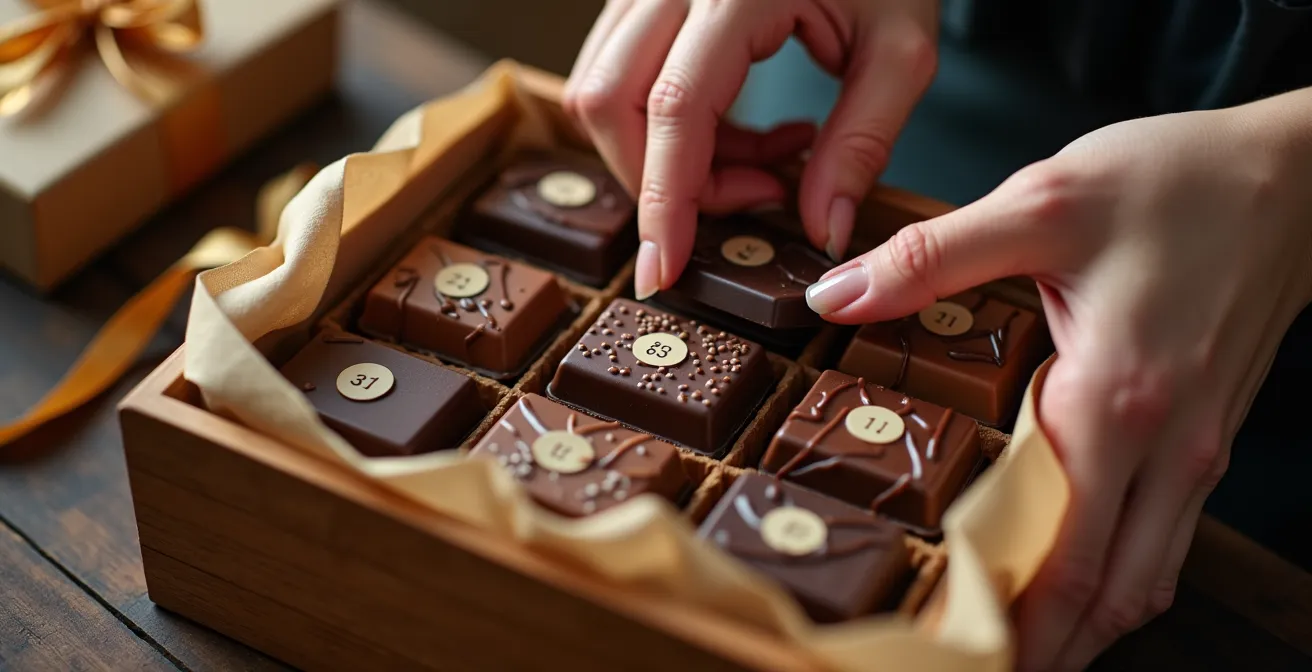
By curating with intent, you ensure that every guest finds something to love while also being gently pushed to try something new. This balance of familiarity and discovery is the hallmark of a truly masterful host.
How to Curate a Chocolate Box That Pleases Every Generation?
Bringing all these elements together is the final and most rewarding step in creating your sensory architecture. You’ve chosen a theme, designed a professional setup, and considered the needs of all your guests. Now, you apply these principles to build the final tasting flight—the curated box that will be the centerpiece of your event. This is where your role as a lifestyle event planner truly comes to life, as you make the final choices that will shape your guests’ experience.
Let’s synthesize our strategy into a final, actionable plan. Imagine you’ve chosen a “Percentage Theme” for a group of 10 friends, with a budget of $100. Your curation might look like this:
- Chocolates (approx. $60-70): Purchase six high-quality bars: 55%, 65%, 72%, 75%, 80%, and 85%. This provides a clear, progressive journey. Buying two of each bar ensures there’s enough for everyone to have a proper sample.
- Palate Cleansers (approx. $10): A box of plain water crackers and a few large bottles of room-temperature still water.
- Printing/Supplies (approx. $5): Simple white paper for the DIY tasting mats and pens for everyone.
- Contingency/Decor (approx. $15): A small buffer for a few unscented candles to create ambiance or an extra chocolate bar that catches your eye.
This plan delivers a sophisticated, multi-stage tasting experience for well under $100. The value is not in the expense, but in the thought. You have created a complete palate journey that respects the science of taste, from the starting point of the welcoming 55% bar to the intense finale of the 85% bar. You have provided the tools for discovery with the tasting mats and the guidance to avoid burnout by controlling the sequence.
By following this guide, you’ve done more than plan a party. You’ve designed an experience. You’ve built a sensory architecture that will guide your friends through a memorable journey of taste and discovery, proving that a truly high-end event is about the quality of the thought, not the size of the budget. Now, all that’s left is to send out the invitations.
Frequently Asked Questions About Chocolate Tasting
What’s the best water temperature for palate cleansing?
Room temperature water is essential as it allows the chocolate’s cocoa butter to melt properly in your mouth. Cold water can numb the palate and hinder the full flavor experience.
How do I arrange chocolates for a blind tasting?
Always start with milder chocolates (like 50-60% cacao) and work your way up to higher, more intense percentages (85%+). This prevents early palate burnout and allows the nuances of each chocolate to be appreciated.
What foods should I avoid before tasting chocolate?
You should avoid any foods with strong, lingering flavors for at least an hour before the tasting. This includes garlic, onion, spicy foods, mint, coffee, and acidic citrus fruits, as they can significantly affect your ability to taste the chocolate accurately.