Achieving a flawless spray finish is a science of fluid dynamics and controlled crystallization, not culinary guesswork.
- The key is managing cocoa butter’s viscosity and polymorphic state through precise temperature control.
- A stable Form V crystal structure is non-negotiable for achieving the required snap, shine, and shelf life.
- Success depends on creating a significant temperature differential between the warm chocolate spray and the cold surface.
Recommendation: Shift your focus from the chocolate recipe to the physical behavior of cocoa butter; mastering its rheology is the secret to predictable, professional results.
For any pastry chef stepping into the world of chocolate spraying, the promise of velvety textures and mirror-like shines is alluring. Yet, the reality is often frustrating: splotchy applications, a dull finish, or cracks appearing as the chocolate sets. The common advice—to simply melt cocoa butter with chocolate—is a dramatic oversimplification. This approach ignores the complex physics at play and is the primary reason for inconsistent results. The problem isn’t your recipe; it’s a misunderstanding of your medium.
The secret to mastering the spray gun lies not in the chocolate itself, but in a deep understanding of its primary fat: cocoa butter. This remarkable ingredient is not just a thinning agent; it is a polymorphic fat whose entire behavior—from its flow rate (rheology) to its final structure—is dictated by temperature and handling. To control the spray, you must first learn to command the crystallization of cocoa butter on a microscopic level. It’s the difference between randomly splashing paint and executing a flawless, durable coating.
But if the key isn’t just mixing, what is it? The true leverage lies in controlling the cocoa butter’s journey from a liquid state to a specific, stable solid form. This article will deconstruct the science behind using cocoa butter for spraying. We will move beyond simple recipes to explore the fundamental principles of rheology, emulsification, and polymorphism. By understanding the ‘why’ behind each step, you will gain the control needed to produce perfect, repeatable results every time.
To fully grasp the techniques that follow, it’s essential to first have a solid understanding of tempering, the foundational process for all high-quality chocolate work. The following video provides an excellent visual overview of the principles of tempering, which we will build upon throughout this guide.
This guide is structured to build your expertise from the ground up. We will begin with the unique properties of cocoa butter, then move through practical applications like coloring and creating moisture barriers, before diving into the advanced science of tempering and polymorphism that separates amateurs from professionals. Use the summary below to navigate the key concepts that will transform your approach to chocolate spraying.
Summary: A Technical Guide to Using Cocoa Butter for Chocolate Spraying
- Why Does Cocoa Butter Melt Exactly at Body Temperature?
- How to Emulsify Pigments into Fat for Vibrant Shells?
- Why Brushing Cocoa Butter Stops Custard from Ruining Crusts?
- Cocoa Butter vs. Coconut Oil: Can You Swap Them in Glazes?
- When to Add Mycryo Powder for Instant Tempering Results?
- How to Achieve Mirror-Like Shine on Your Molded Bonbons?
- Why Does Cocoa Butter Polymorphism Matter for Mouthfeel?
- Why Is Tempering Essential for Snap and Shelf Life?
Why Does Cocoa Butter Melt Exactly at Body Temperature?
The magical quality of chocolate—that it remains solid at room temperature but melts luxuriously in the mouth—is not an accident. It is a direct result of the unique molecular structure of cocoa butter. The melting point of a fat is determined by the composition of its triglycerides. Cocoa butter is predominantly composed of three specific types: POP (palmitic-oleic-palmitic), POS (palmitic-oleic-stearic), and SOS (stearic-oleic-stearic). This uniform triglyceride structure is what gives cocoa butter its sharp melting profile, right around human body temperature.
Scientific research confirms that cocoa butter’s precise melting point is between 34-38°C (93-100°F). This isn’t just a convenient coincidence; it’s a finely tuned property of the cacao plant itself. Recent studies have even pinpointed the specific gene responsible for this characteristic. During the development of the cacao seed, researchers at Penn State discovered that a gene known as SAD1 produces an enzyme that is critical in creating the fatty acid profile that defines this melting point. This genetic programming makes cocoa butter an unparalleled fat for confectionery, providing a textural experience that is almost impossible to replicate with other fats.
For a pastry chef using a spray gun, this property is fundamental. It means that the cocoa butter mixture must be held at a precise temperature to remain fluid enough to spray, yet be able to solidify almost instantly on a colder surface. This rapid phase transition is the basis for techniques like the velvet effect and is essential for building up thin, even layers inside a mold. Understanding this melting behavior is the first step in mastering the rheology, or flow characteristics, of your chocolate spray.
How to Emulsify Pigments into Fat for Vibrant Shells?
Creating brilliantly colored chocolate shells requires more than just stirring in a powder. To achieve a uniform, vibrant hue without specks or streaks, you must create a stable emulsification. Pigments used in chocolate work are fat-soluble, meaning they need to be fully dispersed and suspended within the cocoa butter. If not properly emulsified, the color particles will clump together, leading to a mottled appearance and potentially clogging your spray gun.
The process involves heat, mechanical agitation, and filtration. Melting the cocoa butter opens up its molecular structure, allowing the pigment particles to be introduced. However, simple stirring is not enough. An immersion blender is essential, as its high-speed shearing action breaks down pigment agglomerates and disperses them evenly throughout the fat, creating a homogenous mixture. Professional colorants are designed for this process, with some containing a powerful 40% pigment concentration that allows for intense color with minimal product. Sieving the final mixture is a non-negotiable final step to remove any remaining micro-particles that could compromise the finish.
Once the color is emulsified, the mixture must be “pre-crystallized” before it’s ready for use. This involves cooling the colored cocoa butter while agitating it, encouraging the formation of stable beta crystals. This ensures the color sets with a consistent shine and texture when sprayed. Pouring the warm mixture into a piping bag and rolling it on a cool marble surface is a classic and effective technique for achieving this initial crystallization, preparing it for reheating and spraying.
Why Brushing Cocoa Butter Stops Custard from Ruining Crusts?
One of the classic challenges in pastry is preventing a moist filling, like a custard or a crémeux, from turning a crisp tart shell soggy. The solution lies in creating an impermeable barrier, and pure cocoa butter is the perfect material for the job. When melted and applied in a thin layer, cocoa butter solidifies into a water-repellent seal. This hydrophobic layer acts as a shield, physically preventing moisture from the filling from migrating into the porous structure of the baked crust.
While brushing on a layer of melted cocoa butter is effective, spraying offers a superior application. A spray gun deposits a much thinner, more even, and complete layer than a brush ever could, ensuring there are no microscopic gaps for moisture to penetrate. This technique is taken to another level in professional settings through the principle of thermal shock. Expert chocolatiers use a warm mixture of 60% chocolate and 40% cocoa butter, which they spray onto pastries that have been frozen to at least -18°C. The instantaneous temperature difference causes the cocoa butter to crystallize in a fraction of a second, creating a perfect, micro-thin barrier that also produces the iconic “velvet” texture.
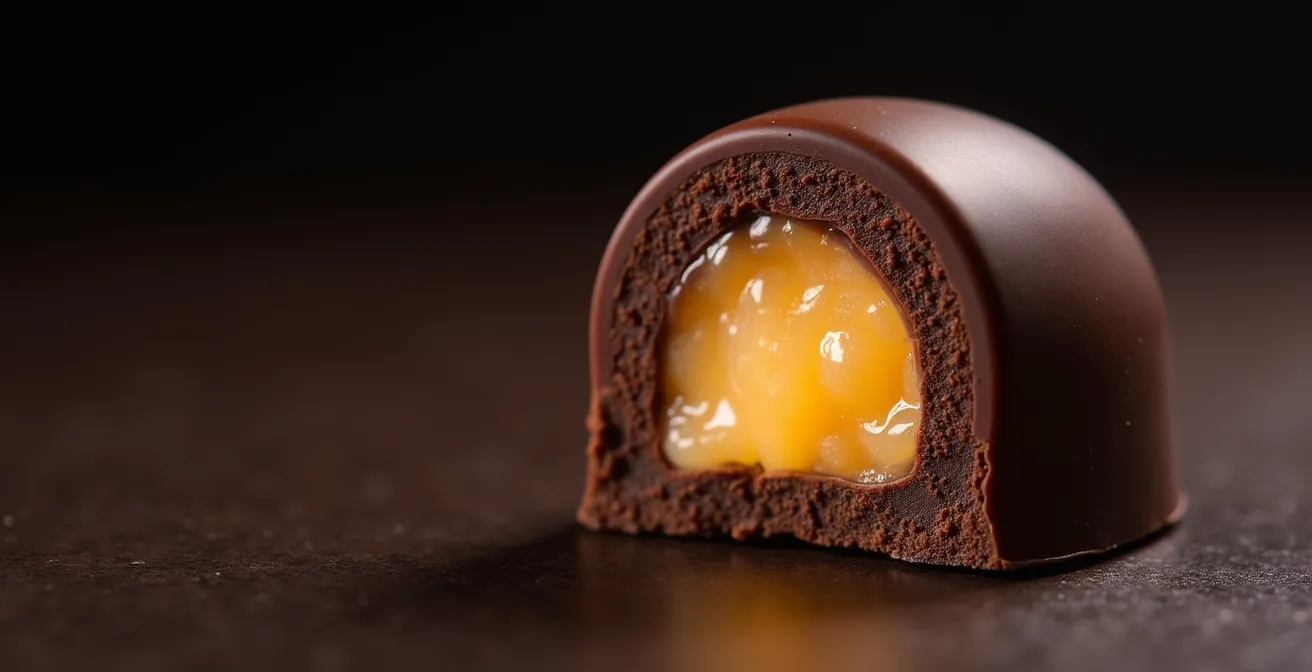
This cross-section view illustrates the concept perfectly. The thin, golden layer of cocoa butter forms a distinct and continuous barrier, protecting the integrity of one component from another. Whether you are protecting a tart shell, sealing a bonbon, or creating a decorative finish, the principle is the same: cocoa butter’s ability to form a solid, fat-based film makes it an indispensable tool for controlling texture and moisture in complex pastries.
Cocoa Butter vs. Coconut Oil: Can You Swap Them in Glazes?
In the quest for a fluid chocolate mixture, a common question arises: can cheaper fats like coconut oil be used to thin chocolate instead of cocoa butter? While both are fats, they are not interchangeable, especially in applications requiring a high-quality finish, like spraying. The answer lies in their fundamentally different chemical structures and physical properties. Attempting to substitute coconut oil for cocoa butter will severely compromise the final product’s texture, appearance, and stability.
The most critical difference is polymorphism. Cocoa butter is polymorphic, meaning it can crystallize into six different forms, with only one (Form V) providing the desirable snap, gloss, and stability. Tempering is the process of forcing cocoa butter to crystallize exclusively in this form. Coconut oil is non-polymorphic; it has no stable crystal structure to “temper.” When it solidifies, it results in a soft, waxy texture with no snap. Furthermore, its melting point is significantly lower than cocoa butter’s, leading to a product that is soft at room temperature and melts too quickly, lacking the satisfying mouthfeel of well-tempered chocolate.
The following table, based on an analysis of fat properties, breaks down the key differences and their impact on a sprayed finish:
| Property | Cocoa Butter | Coconut Oil | Impact on Spraying |
|---|---|---|---|
| Melting Point | 34-37°C (93-98°F) | 24°C (76°F) | Coconut oil results in a soft shell that isn’t stable at room temperature. |
| Polymorphism | 6 crystal forms (temperable) | Non-polymorphic (not temperable) | It is impossible to achieve a tempered structure with coconut oil. |
| Burn Point | 200°C (392°F) | 177°C (350°F) | Cocoa butter is more stable when heated in a spray gun. |
| Crystallization | Stable Form V is achievable | No stable crystalline forms | No snap, shine, or contraction is possible with coconut oil. |
| Texture Result | Hard, snappy, glossy | Soft, waxy, dull | The final mouthfeel and appearance are severely compromised. |
When to Add Mycryo Powder for Instant Tempering Results?
Tempering chocolate for spraying can be a delicate process, but the introduction of Mycryo powder has revolutionized it. Mycryo is pure cocoa butter in a dry, powdered form that has been crystallized into the stable Form V. When added to melted, untempered chocolate at the correct temperature, it acts as a “seed,” encouraging all the other liquid cocoa butter molecules to crystallize in the same stable Form V structure. This seeding method is faster, more reliable, and more forgiving than traditional tempering techniques, making it ideal for the demands of spray gun applications.
The timing and temperature are critical. You must first melt your chocolate and cocoa butter mixture completely to erase any existing crystal structures. Then, it must be cooled to the precise temperature range where Form V crystals can begin to form but other, unstable forms cannot. For dark chocolate, this is typically between 34-35°C. This is the moment to add the Mycryo. Adding it when the chocolate is too hot will simply melt the seed crystals, rendering them useless. Adding it when it’s too cold will result in a thick, un-sprayable mixture.
Once the Mycryo is incorporated, it works quickly to temper the entire batch. The mixture is then gently heated to its ideal spraying temperature, typically around 45°C, to ensure optimal fluidity without destroying the newly formed crystal structure. This allows you to spray a perfectly tempered chocolate that will set quickly with a beautiful gloss and a clean snap.
Your Action Plan: Perfect Spray Tempering with Mycryo
- Melt Completely: Heat your chocolate and cocoa butter mixture to approximately 50°C. This ensures all existing fat crystals are fully melted, creating a blank slate.
- Cool to Seeding Temperature: Allow the mixture to cool down. For dark chocolate, the target is 34-35°C. Use a reliable thermometer and stir occasionally to ensure even cooling.
- Seed with Mycryo: Add 1% Mycryo powder by weight to the mixture (e.g., 10g of Mycryo for 1000g of chocolate). Stir thoroughly to disperse the seed crystals throughout the mass.
- Check for Fluidity: Gently warm the mixture to its ideal spraying temperature, which should be around 45°C. This provides the necessary fluidity for the spray gun without destroying the temper.
- Filter and Spray: Pour the tempered mixture immediately through a fine-mesh sieve directly into a pre-heated spray gun to begin your application.
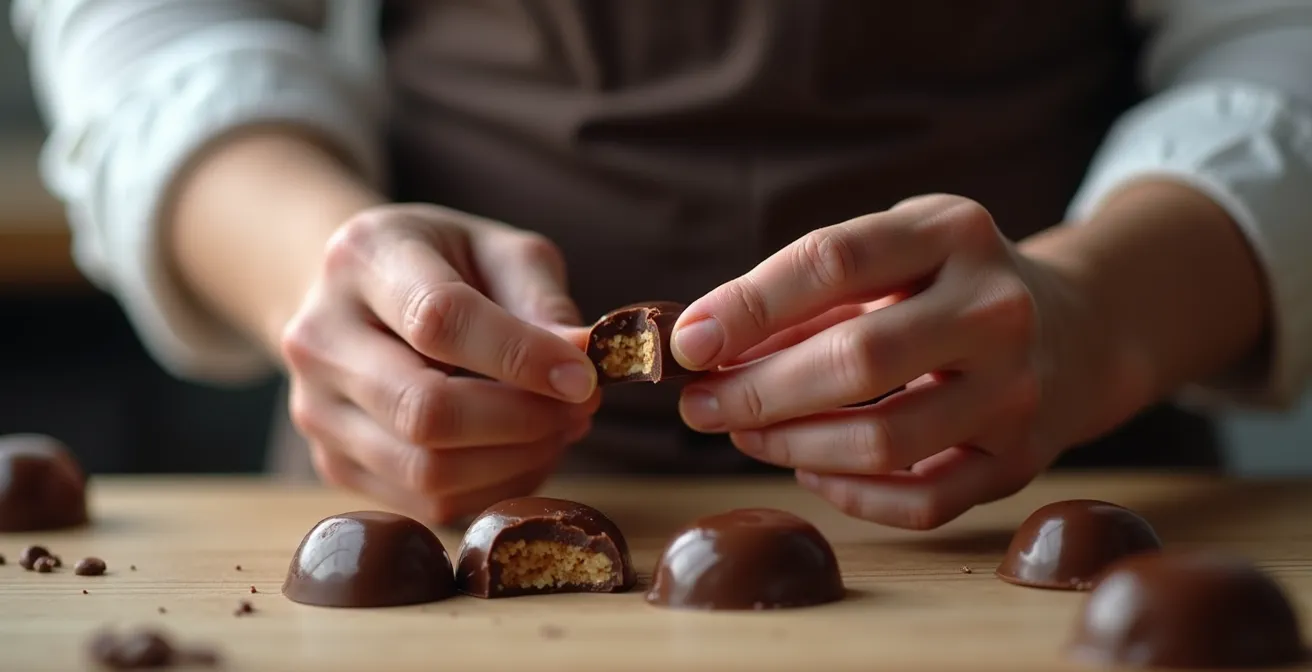
How to Achieve Mirror-Like Shine on Your Molded Bonbons?
A brilliant, mirror-like shine on a chocolate bonbon is the hallmark of a skilled chocolatier. This gloss is not merely a surface effect; it is the macroscopic evidence of a perfectly executed crystallization process. When tempered chocolate sets, the stable Form V cocoa butter crystals align in a dense, orderly fashion. This smooth, compact surface reflects light uniformly, creating the desired shine. For sprayed applications, achieving this effect depends on controlling two key external variables: the temperature of the mold and the spraying technique itself.
The mold is not a passive container; it is an active tool in the crystallization process. If the mold is too cold, the sprayed chocolate will experience thermal shock so severe that it sets before it can properly flow and conform to the surface, resulting in a dull or streaky finish. If the mold is too warm, it will slow down crystallization, allowing unstable crystal forms to develop. For this reason, professional chocolatiers maintain their polycarbonate molds at a precise temperature. The ideal is precisely 20-22°C (68-72°F), which provides the perfect rate of cooling to promote a glossy finish.
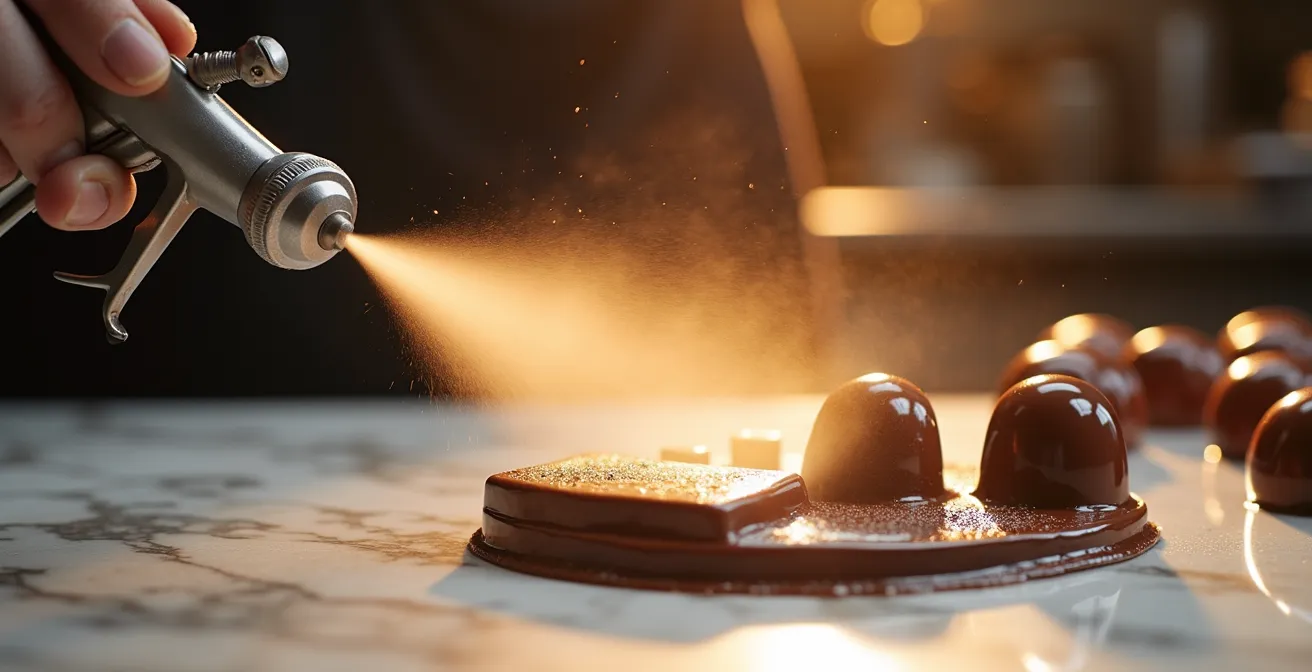
Your spraying distance and application method are equally important. A common beginner’s mistake is to apply too much, too close. A professional technique involves a two-stage process. First, a very light “adhesion coat” is sprayed from a close distance of about 15cm. This initial layer ensures the colored cocoa butter bonds perfectly with the mold. Then, the chocolatier backs up to a distance of approximately 70cm to apply the main finishing coats. This greater distance allows the atomized particles to distribute more evenly, building up a thin, uniform layer that preserves the underlying shine while achieving complete coverage.
Key takeaways
- The unique melting point of cocoa butter, close to body temperature, is the foundation of its superior texture and performance in confectionery.
- Form V is the only stable cocoa butter crystal polymorph that provides the essential snap, shine, and shelf-life required for high-quality chocolate.
- Successful spraying is fundamentally a game of temperature differentials; controlling the heat of your chocolate, your tools, and your application surface is paramount.
Why Does Cocoa Butter Polymorphism Matter for Mouthfeel?
The term polymorphism sounds highly scientific, but its effect is something everyone has experienced: the difference between chocolate that snaps cleanly and melts creamily in your mouth, and chocolate that is crumbly, waxy, or grainy. This textural difference is entirely due to the crystalline structure of the cocoa butter. Polymorphism is the ability of a single compound to solidify into multiple different crystal forms. Cocoa butter has six such forms (I through VI), but only one, Form V, delivers the desired sensory experience.
Each polymorph has a different molecular arrangement, density, and melting point. Unstable forms, like Form I or II, are loose and melt at very low temperatures, leading to a soft, greasy texture. Form V, in contrast, is a dense and highly ordered structure. This density is what gives tempered chocolate its characteristic “snap” when broken. It’s also why it feels so pleasant in the mouth; the Form V polymorph melts at precisely 33.8°C (92.8°F), just below body temperature, releasing its flavor in a smooth, satisfying rush. Any other crystal form will feel waxy or cool on the palate because it melts at the wrong temperature.
However, recent research shows that achieving the correct crystal form is only part of the story. A study published in Nature Communications revealed that even with a perfect Form V temper, the final mechanical properties of chocolate, such as gloss and snap, are heavily dependent on other factors like the presence of minor lipid components, such as phospholipids. This groundbreaking work shows that the surface and bulk microstructure play a crucial role beyond just the crystal form. For the pastry chef, this reinforces that every step—from sourcing ingredients to the final cooling process—contributes to the final texture and mouthfeel.
Why Is Tempering Essential for Snap and Shelf Life?
Tempering is the single most important process in chocolate work. It is the deliberate manipulation of temperature to ensure that the cocoa butter’s fat crystals solidify exclusively into the stable Form V structure. For a sprayed application, this is not just an aesthetic choice for shine; it is a structural necessity for snap, stability, and shelf life. Untempered chocolate, or chocolate that has lost its temper, will result in a product that is soft, prone to fat bloom, and lacks the professional quality your clients expect.
A proper temper provides the “snap” and gloss by creating a dense, uniform crystal network. It also causes the chocolate to contract slightly as it sets. This contraction is vital when working with molds, as it allows the finished bonbon or shell to release cleanly. Without it, the chocolate will stick to the mold. For a sprayed layer, this contraction ensures the thin shell is crisp and tightly bonded, not soft and fragile.
Furthermore, tempering is essential for shelf life. The unstable crystal forms in untempered chocolate will, over time, rearrange themselves into the more stable Form V. As they do, they migrate to the surface, creating a dusty, greyish-white coating known as “fat bloom.” While harmless, it is visually unappealing and gives the chocolate a grainy texture. A perfectly tempered product is stable and will resist blooming for months. This stability is fragile, however. As a recent study on heat resistance highlighted, as soon as temperatures approach the 28-32°C danger zone, the Form V structure begins to break down, and the chocolate starts to lose its temper, demonstrating why temperature control is paramount not just during production, but also during storage.
By applying these scientific principles of rheology, polymorphism, and precise temperature control, you move beyond simply following recipes. You begin to direct the very physics of the chocolate, enabling you to create consistently flawless, professional-grade sprayed finishes with predictable and repeatable success.